If you are an engineer who designs weldments or mangages those who do, you need to be on the lookout for these words. Every time these words are uttered, they cost you money. Lots of money! These words are “Let me run a quick FEA”
These words are words cloaked in speed and efficiency, but they are anything but. Your engineers aren’t to blame necessary, it’s just that he or she is instructed in school specifically to rely on this inferior method. And this method prohibits learning which leads to wasting more time.
Every engineer learns the basics of welding in college, but little else. When faced with real world weldment problems, we quickly turn straight to FEA. There is a large chasm between college techniques and the real world. FEA is the rickety old rope bridge about to collapse.
There are five main considerations to designing a weldment. One needs to understand the welding processes, know how fatigue will impact the structures life, plan out joint design, understand how welds with deform the structure and ensure manufacturability. When these items are implemented in the design process, there will be limited need for FEA.
After making nearly every mistake in the book, I wanted to make a better bridge across this chasm. I collected as much knowledge and insight as possible and created this Design of Weldments Class.
Let’s look deeper into what makes a good weldment from both a Design and Production viewpoint.
Understanding Welds and Communicating Them
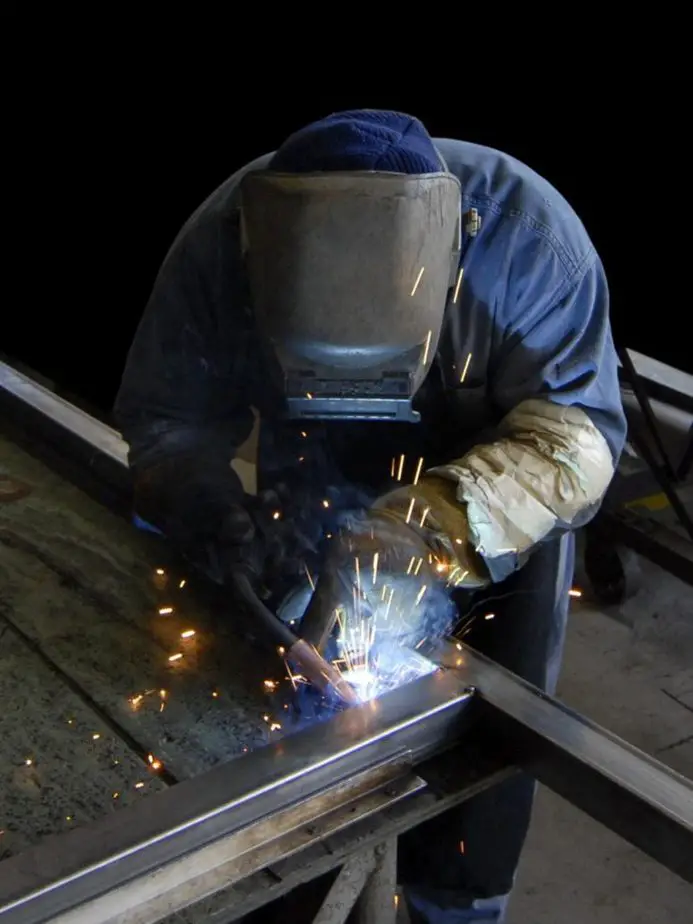
Did you know that brazing and soldering are welding processes? They are! Many think that welding has to have electricity and a filler material must melt the parent material to work right. Find out how atomic closeness and atomic cleanliness are needed for a weld to hold and how the five types of arc welding processes achieve that end.
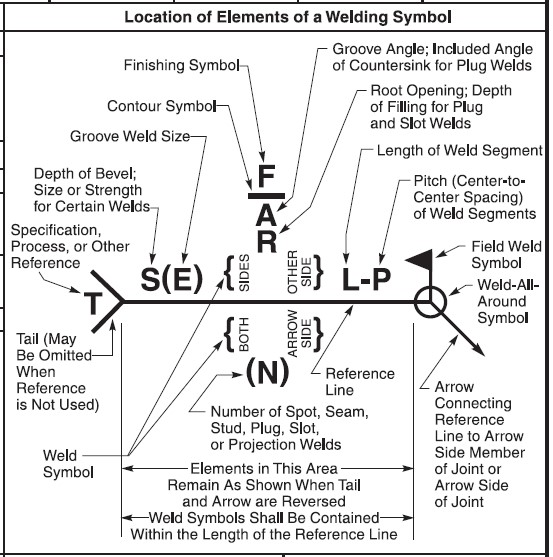
Once you understand what welding is, we need to be able to clearly state our intentions to the welder through the use of weld symbols. They are super complicated (see image below), but we need to understand all the parts and what needs to be used when.
From AWS Weld Chart
There are five ways to joint two plates together. Which one should we use? Some of these joints have inherent benefits over another such as not beveling. We also need to leave gaps in proper places so that we can inspect easier for the correct weld size.
Sizing welds is a difficult process as well. Did you know that you can only use 30% of the weld wire strength in shear to have a good joint? Learn how to size welds quickly.
The welding process introduces complications because of the high temperatures needed. Traditional fatigue analysis is complicated and tedious. It takes too long to perform and there are too many variables to consider.
AISC 360-10 gives us insight on how to classify welds and look for an appropriate “allowable stress range”. Good news here, tensile strength is nearly irrelevant for materials under 100 ksi.
The method shown here simplifies the process so that all you need to know is the weld category (select from a picture), the lifetime cycles and the maximum and minimum stresses. No in depth calculations necessary.
This method also gives us a neat method for estimated how much a weld should increase if there is a field failure. There is a little bit of math here, but a super useful tool to quickly get an answer.
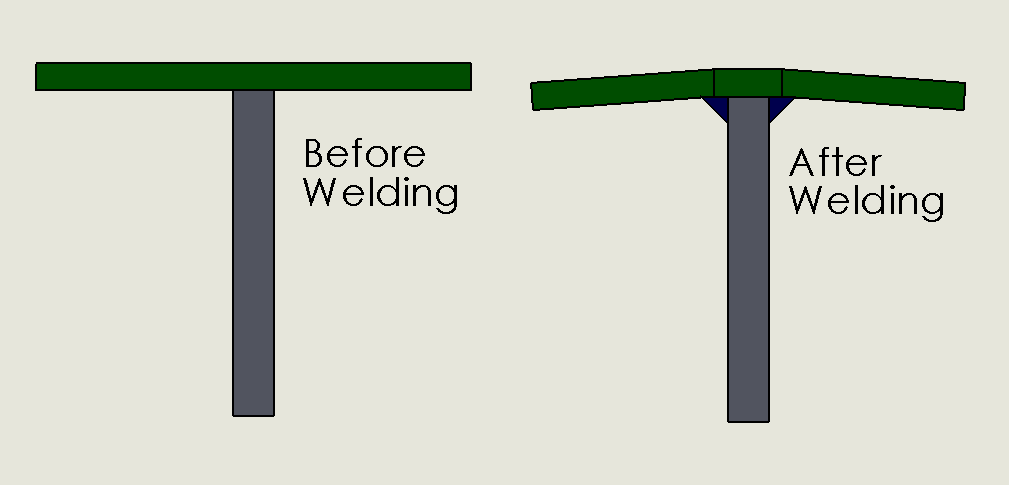
Anticipating Weld Distortion
Weld distortion is a pain! It has plagued me most of my career and just about everyone else I know that designs weldments. The truth is there are many tricks that you can use to minimize or even eliminate weld distortion.
Be the good engineer and plan in advance for your weld distortion rather than reacting to it.
Did you know that if you weld symmetrically along the neutral axis will significantly reduce distortion? Adjusting your weld size is the trick
We will cover numerous mechanical and thermal methods for dealing with distortion. Many that fit in with your current production processes.
I would recommend the class to my coworkers. I thought the videos were perfect length for conveying information and introducing the concepts for further exploration. The strategies for controlling weld distortion were my favorite, possibly because at work we recently experienced issues this. You’ve already addressed my feedback for improvement regarding issuing the lesson links.
Taylor B.
Properly Designing Joints
There is a lot that goes into the proper design of a joint. The Design of Weldments Class gives some fundamentals like balancing forces focusing on stiffness and then flushes these concepts out with examples of sliding applications, gusset design, secondary members, plate to tube joints and using welds in bending.
These fundamentals are powerful and easy to remember so that you will be able to identify a good joint from a bad one instantly. We even have a session where common joints from everyday structures are analyzed.
You can’t design weldmentsin a box! The only reason you are designing a weldment in the first place is to make a product to sell for $$$. As a result, you need to be able to produce this weldment easily and accurately. To do this, one must consider the following:
When to machine
Tolerances and tolerance stackup
Fixturing
The use of tabs and slots
When to Machine
The debate between pre-machining and post machining has been going on for decades. Who is right? Well, both! Which one is right for you? Let’s talk through the pros and cons and leave that up to you to decide.
Taylor B.
Tolerance Stackup
Are your weldments coming out too wide? A common practice is to push all the parts together and that is how wide the part will be. Well, everything has a tolerance: plate thicknesses, kerf on a laser cut part, and cut length on a piece of raw material. Is your design able to handle these tolerances? You may want to leave some gaps, but where and how? One overlooked situation is when bent parts pucker in the corners. We’ll show you how to handle these without using the welder’s most expensive tool…..the GRINDER!
Fixturing
Sure every welder can hand tack every weldment up separately, but having a tack fixture is a god send. A fixture will allow you to create accurate and repeatable parts in a fraction of the time it takes to hand assemble them.
Learn how as the designer, you can tell the fixture designers which features of the weldment are important to hold and which are not.
Tab and Slots
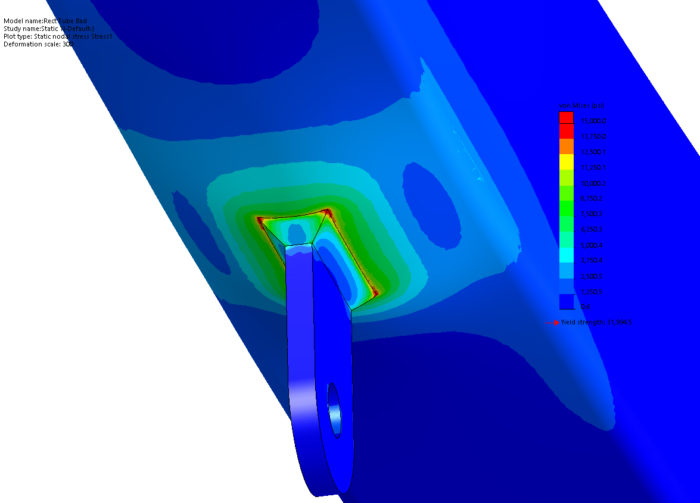
Since the advent of the laser cutter with high accuracy edges, the use of tab and slots is becoming prevalent. And for good reason: self fixturing parts. In many weldments, this can reduce complexity or even eliminate a fixture altogether! Whoo hoo!
Hold on there, what you may not realize is that tabs and slots have multiple stress concentrations in them which are impossible to accurately model in FEA. There are certain slot shapes which can promise more accuracy, but at the cost of strength.
So let’s be smart about designing tabs and slots so that our weldment doesn’t fail unexpectedly.
Summary
There is a lot that goes into the designing of a weldment. This Design of Weldments Class will be the tool you need to design a weldment fast and with low risk of failure.
How Much Hands on Work Do Mechanical Engineers Do?
I’m a hands on engineer and I was skeptical of sitting behind a desk all day looking at a computer. However, I also knew that I wanted to design and build things for a living.
Most mechanical engineering roles are hands off. Some career paths like testing and manufacturing engineering will provide more hands on rolls than design or applications engineering. The size of the company and typical project duration will affect how much hands on time you will have.
At the end of the day, how much hands on time will really come down to what you want to do in your career and how much hands on time you desire. If you want to be hands on, you will find ways to make your job more hands on.
In general though, you will probably still spend at least 50% of your time at a computer or in meetings.
Let’s examine what we can look for in an engineering career that will increase or decrease the amount of hands on work we will do.
Choosing an Engineering Role
Choosing the right role will make a lot of difference in how much hands on time you can get. I have grouped following roles into high medium and low hands on time. These can and might change depending on your company size and industry.
High Hands On Time
Testing, manufacturing and maintenance engineering will offer your highest hands on time.
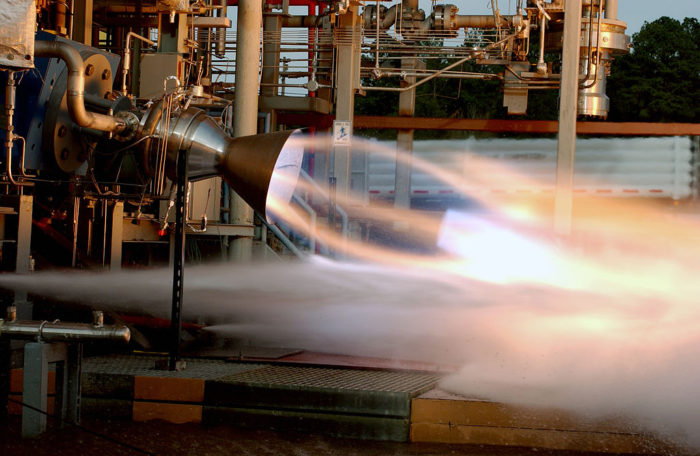
New products need to be tested and that required the design and fabrication of a test and a device to test the product. Here is where you can find a lot of “redneck” engineering in a professional setting, because test equipment is often only used once. Since these products and test methods aren’t proven, you will have a considerable amount of downtime which the test engineer will need to spend time troubleshooting and repair.
NASA, Public domain, via Wikimedia Commons
Manufacturing engineering supports production and will spend a lot of time improving the production process through means of solving bottlenecks, increasing capacity, solving chronic issues and creating fixtures or other tools. This can be one of the most fun ways of increasing your engineering knowledge and skill quickly.
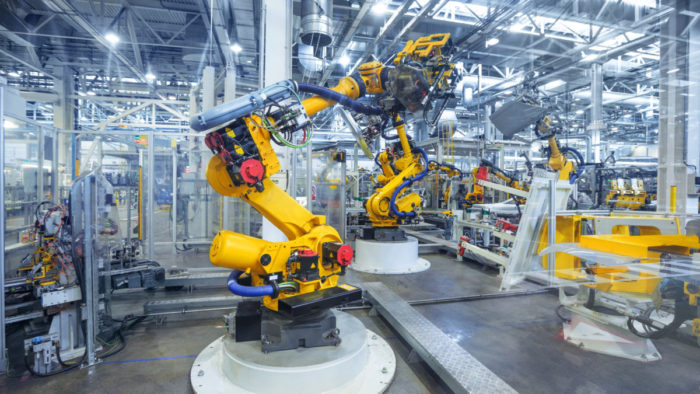
One cool thing is that many manufacturing engineers are programming robots to do production work. This is a great way to expand your skill and knowledge and be nearly 100% hands on.
Maintenance engineering aims to keep the machines and the shop moving smoothly. Most of the maintenance work will be handled by technicians and the engineer would only be involved when a situation needed high level troubleshooting or deviation from a standard process.
If you are good that this position, you wouldn’t need to be hands on because preventative maintenance on the machines would keep them running. However, that is never the case.
Medium Hands On Time
Product support and product design engineering are the middle of the road. You will spend some time hands on, but 60% – 90% of your time behind a computer.
Product Design was the field I chose and I tried to be on the low side of the spectrum. The amount of hands on time usually comes in spurts as well. You may spend a week designing a product and then a few days putting together a prototype and some testing. Then it is back to the computer to make some corrections.
The cycle will vary depending on what you are designing. At a former employer, our planning and design phase may take 8 to 12 months. Once the prototype was ready to be built, I was out there helping for 80% – 90% of my day for several weeks. Once building was done, we would do functional testing and then send it to a satellite campus for more testing.
Likewise, product support usually comes in spurts. Here you would learn of a problem and then gather information. Hands on work here usually consists of visiting one or more customer locations or doing audits of inventory on hand. You may also need to travel to suppliers and audit their process if a particular component is part of the problem or a potential solution.
Low Hands On Time
Quality and applications engineering is probably the lowest hands on time, but this greatly depends on your industry. Quality engineers generally manage how the process of the QA department is going and manage specific issues at a higher level. There are times when they need to inspect a product for a deficiency, but many times this is handled by a QA technicians usually do the day-to-day hands on stuff.
Applications engineers could also be put the Medium category. Many times, the engineer will interview the customer or get a spec sheet and then select the right solution for a product. Most of this is done at your desk. There are cases, like repeated failures of a product, where you may need to visit the customer and see the application.
Company Size
You probably didn’t think that company size was a factor in the amount of hands on work, but they are closely linked.
In a small business (under 50 employees) things are very flexible. You may find that after designing a product, you are designing the fixtures to produce it, inspecting parts, assembling the prototypes, and then testing the product. Once the product is in the field, you me be handling product support issues. At one company I worked for, I was also the IT guy. That got me up and moving around as well.
Many of these roles are hands on and get you off your butt and learning about all facets of engineering and production. I worked for two companies this size and thrived in this environment.
Large companies over about 250 employees start to departmentalize for the sake of efficiency and the scope of your work may be limited. Generally speaking, you will see these departments pop up:
Research and Development
Product Design
Quality
Manufacturing / Production
Testing
Product Support
Applications
In this case, you may be forced to choose between a roll that is all hands off or one that is very hands on.
I worked for a large company in the product design group and most of my job relied upon computer work. However, I was still able to get some hands on time. I made it a point to cycle through the shop and see how the production was going. Every once in a while I would help a worker do his/her job and hammer in a pin.
I also became the “go to guy” for solving unique issues with the product. Often this would consist of diagnosing unusual mechanical, hydraulic or electrical issues. This was usually a welcomed break from the daily grind.
On one occasion, I was able to do some product testing where a hard to get to hydraulic cylinders needed to be replumbed after some testing. I ended up under the machine with the cylinder directly above my chest and lots of oil oozing all over me. It was AWESOME!
When I was finished, I was covered in sweat and oil (mostly oil) and went to my boss to ask to take the rest of the day off to clean up (it was already mid afternoon). He mentioned to me that you could have had someone else do that for you. My response was, “Why would you want to take this away from me?”
Development Timeline
There are so many industries that use mechanical engineers that it is impossible to classify them all. I would encourage you to instead look at how long it takes to develop a product. This can tell you a lot about how much hands on time you will expect to see.
In my former roll, we worked on project that took roughly 2.5 to 3.5 years to complete. The first 6-12 months was design, followed by a year of prototyping, testing and customer evaluations. We would then monitor its progress in the field for a year before closing out the project. The hands on time would come in spurts for the prototype and testing for one to two months in this timeline.
While this doesn’t seem like much hands on time, there may be three of these projects going on simultaneously.
In a job before that, there was a much shorter project duration and the company focused more on the design and prototyping. Most testing was done by the client and we didn’t monitor how it worked in the field. Projects lasted between 1 and 8 months and as a result, I spent a lot more time working in the shop hands on.
Summary
In any field, you can be hands on or not. I have found that many engineers who are hands on develop their technical skills much faster than those who sit behind a desk all day. Being hands on also allows you see first hand what good and bad design are and how something overlooked in the design can cause problems for production and support.
Remember that you can often switch jobs in a company. You may need to take any job at a company you want to work for and then focus on transferring to another department as roles open up.
Steel and Aluminum are the two most popular materials when it comes to making structures. Yet, steel seems to win more. One of the ways that it beats Aluminum is in fatigue because aluminum does not have an endurance limit.
Aluminum does not have an endurance limit because of the material’s microstructure. Many metals have a face centered cubic structure while steel has a body centered cubic structure. The body centered cubic crystalline structure leads to harder and less ductile materials.
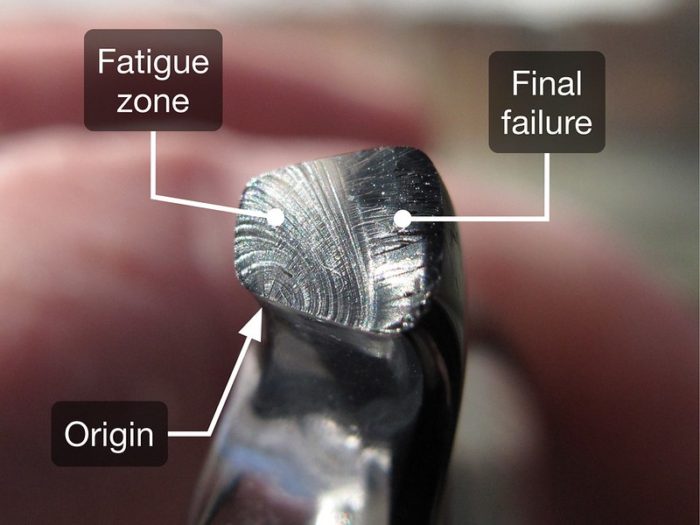
What is Fatigue
Fatigue is the cyclical loading and unloading of a material. The load may be fully reversing from full equal tension and compression like a cantilevered load on a rotating shaft. It could also be loaded from no load to full tension or any combination in between.
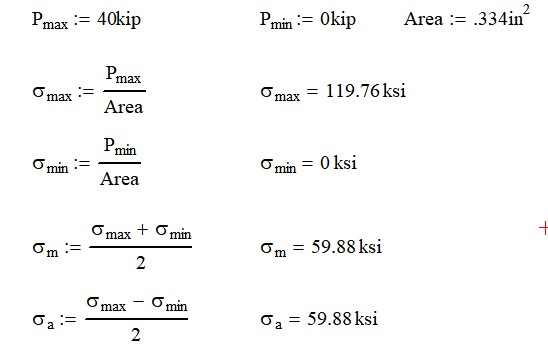
Fatigue is a very complicated issue; far to broad to discuss in detail here. Let’s look at the example of a screw that is cyclically loaded from no load to 40 kips. When designing this system, we definitely want infinite life in our fastener.
Mean and Alternating Stresses
Finding the average (mean) stress and the alternating stress on the fastener can be calculated from the minimum and maximum stresses on the fastener. In our example above, we will use a 3/4″ Grade 8 bolt. This bolt has 150 ksi tensile strength and a cross sectional area of 0.334 in2.
Looking at the calculations below, we see that our mean and alternating stress are equal at roughly 60 ksi.
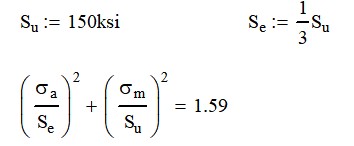
Now, we need to a way to evaluate if this is good enough. There are several tools we can use; the Goodman, Soderberg and ASME Elliptical. I choose to use the ASME Elliptical Criterion because it seems to fit the empirical data better.
We also need to know the Ultimate or Tensile Strength and the Endurance Limit. The ultimate strength of a bolt is readily known, but the endurance limit is a little more tricky and many materials don’t have one.
The endurance limit is the maximum alternating stress that a material can withstand forever when there is not mean stress. For steel, this value can be as high as 1/2 of the ultimate stress to lower than 40%. If you don’t know what the endurance strength of your material is, I would use a factor of 1/3.
From here, we can use the ASME Elliptic Criterion to evaluate if the fastener will survive. Values below 1.00 indicate the fastener is properly designed.
What is the Endurance Limit
The endurance limit of a material is the stress at which the material can be loaded repeatedly without failure. The chart below is a fitted curve to the data. Curve A shows a material that has and endurance limit, Se. You can see that it is horizontal line after about 2 or 3 million cycles (its a logarithmic scale).
However, Curve B does not have an endurance limit; the slope is constantly decreasing. This means that there is no such thing as “infinite life” with materials like aluminum.
What we need to do in this case is to figure out how many cycles our structure really needs to withstand. This is not to difficult to estimate in most cases. Many pieces of equipment that I have designed never saw more than 200,000 cycles.
In this case, you would take your cycles and multiply them by a design factor (I use 2). I would see where Curve B intersects the expected life with the design factor. This would be your “endurance limit” that would be used in equation above.
Why Does Steel Have an Endurance Limit
The real question isn’t why aluminum doesn’t have an endurance limit. It is why does steel have one? The answer lies in the crystalline structure of the materials.
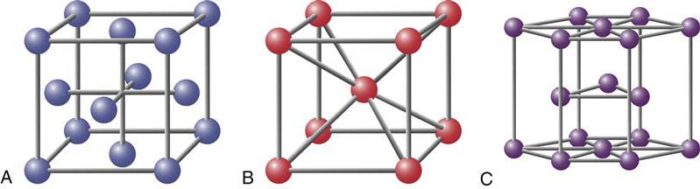
A. Face Centered Cubic
Materials like lead, copper, nickel and aluminum are face centered cubic lattice structures. This structure type is the most ductile because there are well defined slip planes in the material. Slip planes are where the atoms in the material can slip past each other when shear load is applied. For more information on this subject, please read this article.
Creep
With the face centered cubic, these materials are prone to creep which is continual deformation of the material at low temperatures and under load.
Aluminum wiring is popular because it conducts electricity better than copper. However, it does change shape over time when under load. This leads to the wire conforming to the shape of a typical screw terminal. This will lead to a loose wire, sparking and possibly electrical fires. For this reason, special terminals must be used with aluminum wiring.
While both copper and aluminum are face centered cubics, the rate of aluminum is 25 times more than that of copper.
B. Body Centered Cubic
A body centered cubic has 8 direct neighboring atoms. It looses a little ductility, but in return it gains strength. It is harder for slip to occur in a body centered cubic. Examples are chromium, iron (steel), molybdenum, tungsten and vanadium. It is interesting that many of the metals used to give steel unique properties are also BCC.
C. Hexagonal Close Packed
The hexagonal lattice structure is surrounded by 12 direct neighboring atoms and offers the most strength with the least amount of ductility. Examples of this are cobalt, titanium, magnesium and zinc.
Why Does The Structure Matter
The structure matters because the face centered cubic will be too weak and ductile to carry any real load. Aluminum, while strong, has a maximum yield strength of roughly 40 ksi (275 MPa) after thermal processing. Steel, a body centered cubic, can have strengths up to 300 ksi (2068 MPa).
There is also a noticeable reduction in ductility for steel when compared to Aluminum. For steel, ductility is generally around 15% to 25%. However, Aluminum that has a minimal amount of thermal processing can have ductility approaching 40%.
The increased ductility caused by well defined slip planes prone to material creep is the main source of why Aluminum does not have an endurance limit.
When Should I Use Aluminum in Fatigue
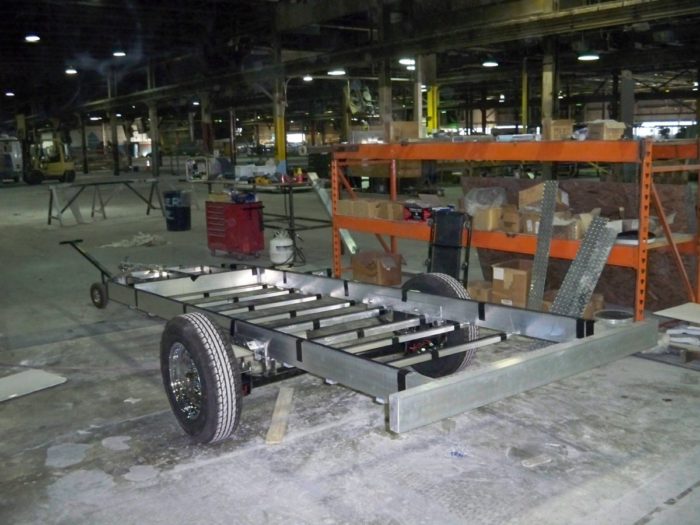
Now to the practical application. Aluminum has many great qualities that steel just can’t match up with; namely its light weight and corrosion resistance. Aluminum’s main drawbacks are its lack of fatigue strength, poor weld strength and cost.
Image courtesy of Chris Dunphy Note the lack of welds in this trailer design
I would recommend using unwelded Aluminum for low cycle fatigue. These are applications where the number of cycles the material will see is predictable.
Aluminum is used on airplanes because there are very predictable load cycles. A plane probably only has high loads on it at takeoff and landing. If it does this 7 times a day for 30 years, this is only 153,000 cycles.
You would not want to use Aluminum in a trailer design because it will see many millions of cycles over a few years. Every bump puts new loads of unknown magnitude into the structure. High cycle fatigue quickly becomes an issue.
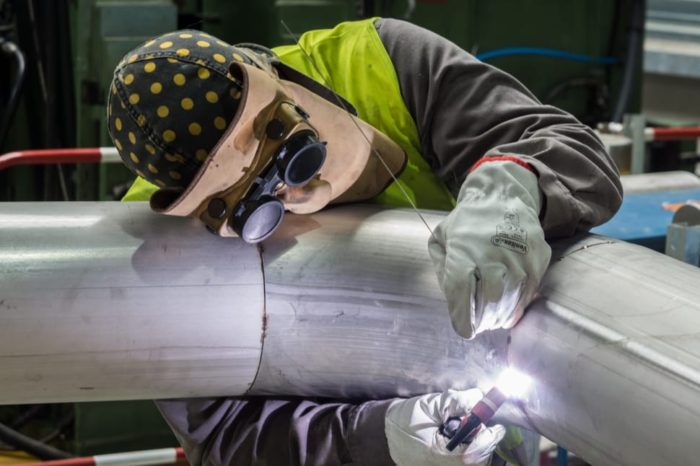
Does Welding Aluminum Weaken the Metal?
Have you ever noticed that airplanes are riveted together and not welded? There’s a good reason for that. Welding on aluminum will weaken the design. The heat from the welding process will remove all thermal processing from the parent material leaving it in a T-0 condition. For 6061-T6 that is a reduction from 40 ksi (275MPa) to 7 ksi (48 MPa). Ouch!
This is the reason why aircraft manufacturers avoid the weld process altogether and choose a mechanical process.
Side note – Another reason is that the rivets will distribute stress differently than a welded joint. When ships started converting from riveted design to welded design, they used the same proven designs. As a result, cracks started developing because the stresses were transferred from one piece to another in new ways. Some ships sank as a result.
Thermal Processing
When your weldment is complete, you may have tubes and bars that are a certain tempers like T-6 (full strength) and T-4 (half strength), but your welds are at T-0. It is possible to process the weldment to regain the T-6 temper by having the weldment heat treated. Unfortunately, this is another costly process and depending on how large your weldment is, it may be impossible. At this point, it may be better off to switch to steel.
I wonder how much a heat treat oven the size of a 747 costs….
Summary
The face centered cubic crystalline structure of Aluminum offers great ductility in the material at the expense of strength. This is the underlying cause of why Aluminum does not have an endurance limit and why it is not a good choice for high cycle fatigue loadings.
Welding Aluminum removes the temper of the parent material due to the heat from the weld. It can be heat treated to regain strength, but more often than not it is not cost effective to due so.
One of the questions I get often from interns or young engineers is, should I get a Master’s in Engineering? Society puts a lot of emphasis on higher education and generally speaking, it is worth it. But in my experience, I have learned that for many engineers it is just not needed.
You should not consider getting a Masters Degree in Mechanical Engineering unless you desire to do specialized technical work or research. Instead, you will benefit more by working and acquiring your Professional Engineer License or other certification.
My advice is based on twenty years of experience in engineering and design. I have seen many engineers doing the same job; one with a master’s degree and the other with a bachelor’s degree, earning the same wage. This surprised me, but some engineering jobs just don’t require the extra education, nor is it rewarded.
Don’t get the wrong impression, it is essential to keep growing in your field of study throughout your career. Learning is what keeps your young. However, taking on lots of debt and spending years to get a degree may not be the best career path for you.
But some engineering jobs just don’t require the extra education, nor is it rewarded.
I intend to reveal several alternatives that cost a fraction of an advanced degree and are just as good if not better for your career path. We will explore several key factors that you should consider in the decision-making process as to whether the pursuit of a master’s degree is the best move for your future in engineering.
Why You Should Get a Masters Degree
The first consideration in whether to pursue an advanced degree depends on what you want to do with your career. If you want to work for NASA, in a nuclear facility, do highly technical work or conduct advanced research, it is more likely you will need at least a master’s degree (if not a doctorate)!
These careers should be obvious to you because they are rare and prestigious. In these careers, qualified applicants are a dime a dozen and having a MS would be something that sets you apart from the pack.
If this is what you are driven to do, do it! However, be smart about it.
Graduate degrees are expensive and I don’t like debt. One of my college professors told me that the goal of graduate school is to make someone else pay for it. While it seems odd, there are many ways to have some one else pay for your education.
Colleges are all about prestige and want to show off the best and brightest students to the world. That could be you! If they want this opportunity, make them pay for it.
Likewise, the company you work for wants to be successful and if they see promise in your abilities they may foot the bill for a graduate degree.
Just make sure that your college, employer, or someone else shoulders the cost of the degree. The last thing that you want hanging over your head is a large amount of debt at the start of your career. It will limit you options as you progress through your career.
On average it can cost around $60K to get your master’s and an additional $100K+ to obtain a PhD in Engineering. Most of the time if you are qualified enough to do higher end jobs then someone will support you financially in getting your master’s.
If you can’t get someone to help out financially with a graduate degree, consider it a sign. Maybe you should reconsider.
Why You Shouldn’t Get a Masters Degree
Potential Earnings
You probably noticed, that in the pros category additional salary was missing. Its because it is not a pro. In fact it is a con. Let me explain.
Getting paid more is usually a good thing, right? Yes and no. In this case, you are getting an increase in salary (on average) with a Masters degree than with a BS. The same follows with a doctorate.
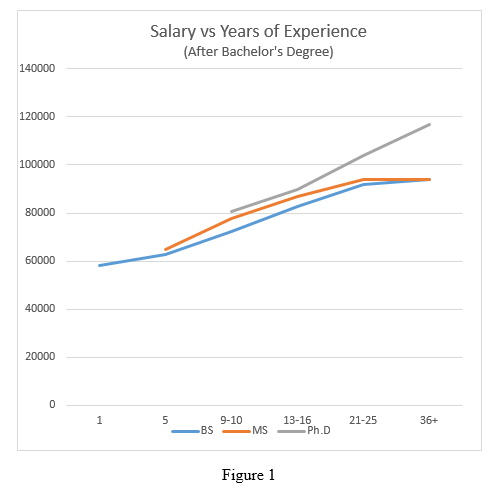
The next important consideration would be to look at the data for career earnings by education level (or degree earned) for engineers. To get the full picture, we need to look at how salaries change over time. The information in the chart below is from the American Association of Engineering Societies (AAES) 2015 Salary Survey. The data sampled engineers of all disciplines and degree levels.
At first glance, getting an advanced degree makes sense. More money. Wrong!
We would want to give this data due consideration because of the effects it has on your total career earnings, investments, and retirement funds over time. Figure 1 breaks down average earnings vs degree earned. The timeline starts when you receive your bachelor’s degree.
According to current data spanning all engineer types, the base salary with a bachelor’s degree starts around 58K a year. On average the salary will rise and eventually level off after 20 years into a career. Remember with a bachelor’s degree there is no loss of earnings due to extended education time as there is with an advanced degree, so the money starts coming in with your first job.
With a master’s degree, the starting salary will bump up to around 60K, but two years of salary would have been lost from our total career earnings. In addition, the potential debt of student loans can compound the loss of income as well. The same occurs at the doctorate level, with annual salaries starting around 70K, but can cost up to seven years of a shortened career if you are a full time student.
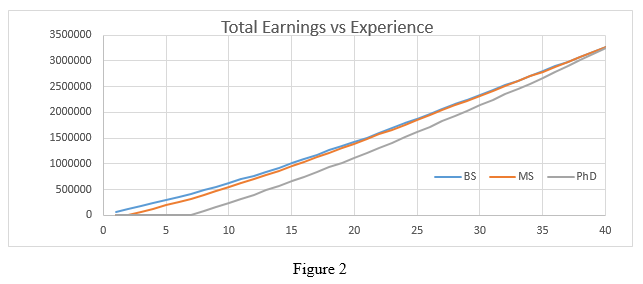
When we chart how these earnings play out over a career, a much different picture is painted. This may not be desirable to many. Figure 2 shows lifetime earnings. (Note that these engineers will make over 3 million over their careers.)
The interesting factor in all of this is that given these figures, we find that at the end of the average career (about 40 years) the average income level for each degree intersects. For example, considering the PhD level, it would take 32 years’ worth of work to compensate the amount of career earnings as someone with a bachelor’s degree.
At this point, it is important to ask whether or not the additional seven years of study and hard work would be the better option for your career path? Is the time not making salary, potentially taking on debt, and losing retirement funds worth it?
Inflation
Though it is not factored into data, inflation plays a role here too. The data was all taken in 2015 and did not follow individuals throughout their career. The engineer that is about to retire making $90k a year would have been head over heals to make $58/k starting out. My first engineering job was $32k and that was twenty years ago.
Those early years of earnings will buy you more than the high salaries in later years due to inflation. This is also why you should start saving early for retirement.
Putting Aside for Retirement
While we are on the subject of retirement, I would briefly mention saving for retirement and the future value of money. The “rule of 72”, generally speaking is a tool to estimate how long an amount will take to double. For example, the market over the last 100 years has grown, on average, 12% a year. Using the rule of 72, we find that our money will double in 6 years (72/12=6).
If we put $100 into a retirement account in year 1, we should have doubled it roughly seven times for a total of $12,800! While not exact (and you should consult your financial advisor), investing early definitely has it’s perks. Right now, you can invest $6000 a year into an IRA (choose Roth at a young age). At the end of your career, that one time yearly investment could become $712,000.
If you were to get a doctorate 7 years later and then invest the $6000, it would only be $308,000 at retirement. That’s less then half! The point of the story is this: Invest Young and Start Early. Especially if your employer matches.
Personally, I have not pursued a master’s degree because I do not see much value in it to advance my career or generate more revenue. I believe these figures justify my decision.
I am not saying there are no circumstances where a person might benefit from an advanced degree. I only caution the pursuit of it unless you are choosing a career path in engineering that requires it.
There are several alternative options available to those serious about growing in their career field and succeeding as engineers long term without a Master’s in Engineering. Most of these are well recognized in the industry and many engineers have overlapping licenses and certifications from each of these options:
These alternatives can be:
Fundamentals of Engineering Exam (FE Exam)
Professional Engineering License (PE License)
SAE Certifications
International Fluid Power Society (IFPS) Certifications
Six Sigma Certification Programs
Do your own research and publish it
Masters in Business Administration (MBA) Programs
Professional Engineer or FE Certifications
As a starting point, I recommend looking into the Fundamentals of Engineering Exam (FE Exam) as it provides a solid foundation for further education. Next, I recommend getting your Professional Engineering License (PE License).
Getting your PE show employers that you are very serious about engineering and are committed to your own long-term growth
The cost for obtaining this license is usually less than a $1K investment, which when compared to higher education is much more affordable. Keep in mind it will take time to study and learn the material to obtain the certification. A masters degree would too.
While pursuing these options you will need to get several other professional engineers to sign off on your work. Make it a habit of logging your work. The log should include the project goals, how they were accomplished and what obstacles you had to overcome. Its hard to believe, but only a few months after a project is complete, the hardest parts about can already be forgotten.
If one of the Professional Engineers writing you a recommendation isn’t directly familiar with your work, this log becomes useful to demonstrate competency and experience.
Most importantly, getting your PE and/or FE show employers that you are very serious about engineering and are committed to your own long-term growth.
SAE Training / Certifications
Next, I would recommend SAE certifications for career advancement. Even though they are geared for the automotive environment, they touch on so many disciplines of engineering. Not only will you find help on the design side for mechanics, controls, and communications, but also, training on project management, industrial design, and quality control. There is definitely something for everyone. I have taken several classes from SAE on fatigue, designing for robustness, and finite element analysis.
Although they tend to be a bit more expensive than the PE License, often your employer will assist with the cost as you are training for a specialty or need additional certification. Take advantage of it!
International Fluid Power Society
Another option is the International Fluid Power Society (IFPS) which offers many technical fluid power certification programs such as mobile hydraulic technicians, pneumatic specialists, control systems specialists, and fluid power engineers.
The certifications touch on many of the engineering disciplines including; mechanical, electrical/controls, and fluid power. I have learned that if you plan your certifications just right it will allow you get a new certification every five years to remain current with all certifications held and eventually you can work up to the fluid power engineer.
An expensive option that looks at quality issues and setting up processes to improve manufacturing and business processes is called Six Sigma. It can be expensive ($100K) and has a method of obtaining certifications which give a greater command of the Six Sigma methods. Larger firms and companies may offer or provide access to these certification programs.
This would be a career path that would put you in high demand with top companies.
Do Your Own Research and Publish
Many people, like me, just want to keep learning and experimenting. That’s part of the reason that I started writing, I wanted to learn more and share it with others. While I publish myself, I encourage you to do the same.
Find a specific subject that is interesting to you and has a wide audience. Do some research and talk to the experts about it. Don’t be shy about reaching out to them as long as you have clear questions to ask. More often then not, they will be excited to talk to you.
Once your research is complete, start writing. If you want to get it published, trade magazines are probably the way to go, because they are always looking for good content. You probably already have a few in mind that would run your article. Contact them to see what the requirements are for getting published.
The main benefit in doing your own research is to keep learning. In my opinion, learning is vital to staying young and there is so much to learn. However, if you get published in several magazines, you might find an additional benefit in becoming the expert, because you are.
Master’s in Business Administration
If you are interested in taking the management route, it would be worthwhile to explore different MBA programs. Getting an MBA can help broaden opportunities in the business side of the engineering world and is a viable alternative to working in the more technical side of the industry.
I recommend this over the MS degree because there are a lot more schools that offer this degree, so there is more competition for you business. In addition, many schools are setup for “working” students so you can work your full time job and then take classes a few times a week. You will have to be in school for longer if this is the case.
Third, if you already have an engineering degree, getting an MBA should be less of a time commitment because you are smart and there are no labs and lab reports.
Again, this will come with the higher price of education so be sure to investigate options that can mediate the cost and not add future debt.
The Bottom Line
In summary, getting an advanced degree is not necessary for most engineering work. As I mentioned before, if you need an advanced degree for a particular field of work within the engineering industry, then by all means pursue it.
My biggest concern with all of this is the time investment, loss of career earnings and retirement funds, and potential increased debt due to student loans. I think it is important to look at all the variables and explore any alternative options that may be a better choice for your career path in the long run.
It may be helpful to keep in mind that if you cannot find someone to sponsor your investment in an advanced degree then that could be a good indicator that you should not be pursuing it now. Wait a few years and reconsider it in the future. Whatever direction you take, be sure you know the potential risks involved and have a clear vision for your future career goals.