

This videos starts a series for a review of strength of materials. Face it, its been a long time since we used this.
See all the videos in the course here or on YouTube.
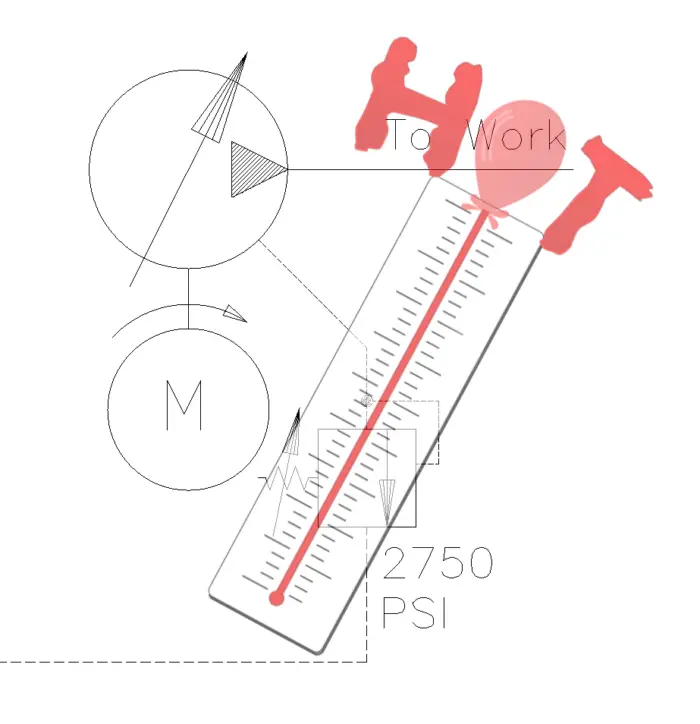
Over the past 20 years, most of the hydraulic systems I’ve worked on have been between 2500 psi and 3000 psi (165 to 207 bar). There have been a few subsystems where the pressure was less (600 psi, 41 bar) and once where the pressure was intensified to 10,000 psi (690 bar)!
The question I’ve never really asked is, “What is the ideal system pressure for hydraulics?”
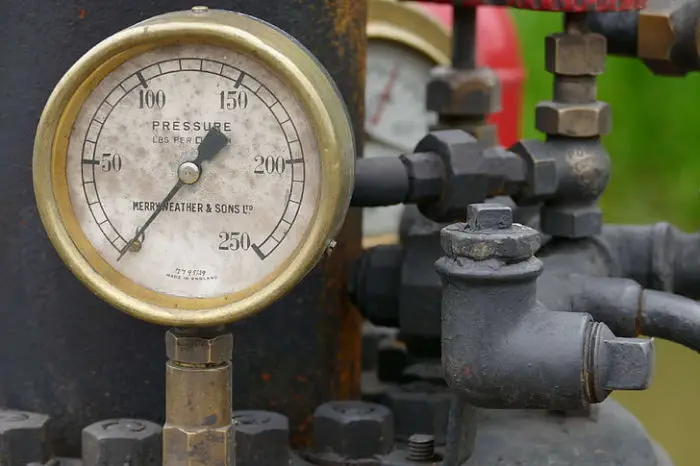
The ideal hydraulic system pressure range is between 2500 and 3000 psi (172 to 207 bar) because of safety, internal leakage, weight and size. Also, many components are not available in higher pressures. Higher pressure hydraulics makes the most sense when using hydraulic motors or space constraints are an issue.
Hydraulics are inherently dangerous. Pin hole leaks can shoot out fluid strong enough to cut off your arm! If it gets in your blood stream, hydraulic oil can stop your heart.
Common sense tells us that if we have these issues at lower pressures, amplifying the pressure only make the problem or the likelyhood of the problem worse. A 10,000 psi system is more prone to leakage and hose wear than a 3,000 psi system. These lead to safety issues.
I would postulate that as you double the pressure, you are 4x to 8x more likely to have issues with leakage and wear.
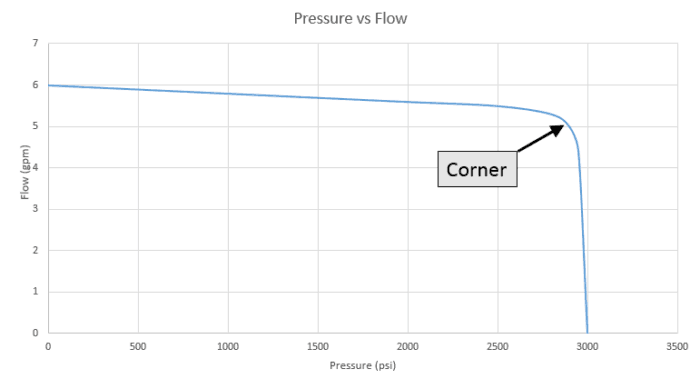
Hydraulic components aren’t leak proof. In a gear pump, there are small cavities between the gear lands and the shell. There are also small gaps between the cavity and the side of the gear. The graph below shows how flow is reduced from 6 gpm to 5.5 gpm as the pressure increases from 0 to 2800 psi.
Pumps are not the only components that leak, valves are also notorious. A typical valve spool must be smaller than the bore it fits in. With modern machining capabilities, these bores can be honed with a gap that is roughly 0.0005″ (1.27 μm). That is a very tight tolerance, but it is large enough to leak. This is why we don’t use valves to hold loads for long periods of time.
Cylinders also leak. The seals can only seal so well, which means leakage. This is compounded as the cylinder ages and pitting and other dents form on the rod.
To mitigate some of these risks, there may be several seals on the piston and end gland. If one seal fails, others will be there as a backup.
However, in normal use, a seal may leak some pressure across one seal to the next. Imagine a cylinder where there were two seals on a piston and you were extending the cylinder with full pressure of 3000 psi. If both seals leaked a little bit, eventually the pressures would be 3000 psi in the barrel, 0 psi in the rod and 1500 psi in between the seals. In this case, we will have some leakage, but it has a smaller pressure range over each seal (1500 psi and not 3000 psi)
All this is to illustrate that components leak. Amplifying the pressure is a sure way to make them leak faster.
Every cylinder application is somewhat unique. Some cylinders are only in compression, others only in tension and some switch from compression to tension as the stroke increases. On top of that, there are so many pressures we can operate at.
As we select a cylinder, we need to consider the extend and retract forces, buckling and weight. Buckling here is the unseen culprit and can lead to very heavy cylinders.
Let’s look at the example of a 30″ stroke cylinder that needs to support 38 kip in compression at full length. We will use the Euler buckling strength to determine the rod size.
| Bore | 2000 | 2500 | 3000 | |||||||||
|---|---|---|---|---|---|---|---|---|---|---|---|---|
| Force | OD | Rod | Weight/in | Force | OD | Rod | Weight/in | Force | OD | Rod | Weight/in | |
| in | kip | in | in | lb/in | kip | in | in | lb/in | kip | in | in | lb/in |
| 3 | 16.6 | 3.25 | 2 | 1.2 | 21.6 | 3.375 | 2 | 1.4 | 27 | 3.38 | 2.25 | 1.7 |
| 4 | 29.5 | 4.38 | 2.25 | 1.8 | 38.4 | 4.5 | 2.5 | 2.3 | 47.9 | 4.5 | 2.5 | 2.3 |
| 5 | 46.1 | 5.5 | 2.5 | 2.6 | 60 | 5.63 | 2.75 | 3.2 | 74.9 | 5.75 | 2.75 | 3.5 |
| 6 | 66.4 | 6.5 | 2.75 | 3.1 | 86.4 | 6.63 | 3 | 3.8 | 107.9 | 6.88 | 3 | 4.5 |
| 8 | 118 | 8.75 | 3 | 4.8 | 153.5 | 9 | 3.25 | 6.1 | 191.8 | 9.25 | 3.5 | 7.5 |
| Bore | 4000 | 5000 | ||||||||||
| Force | OD | Rod | Weight/in | Force | OD | Rod | Weight/in | |||||
| in | kip | in | in | lb/in | kip | in | in | lb/in | ||||
| 3 | 39 | 3.63 | 2.38 | 2.2 | 52.8 | 3.75 | 2.5 | 2.5 | ||||
| 4 | 69.3 | 4.75 | 2.75 | 3.1 | 93.9 | 5 | 3 | 4.0 | ||||
| 5 | 108.2 | 5.88 | 3 | 4.1 | 146.7 | 6.25 | 3.25 | 5.5 | ||||
| 6 | 155.9 | 7.25 | 3.25 | 6.0 | 211.2 | 7.5 | 3.5 | 7.2 | ||||
| 8 | 277.1 | 9.5 | 3.75 | 9.0 | 375.4 | 10 | 4.25 | 12.0 | ||||
From the table above, we need:
Working at 3000 and 5000 psi, the cylinder is over designed and there is not added benefit. I makes sense to reduce the pressures to 2500 and 4000 psi respectively. The 3″ bore cylinder working at 4000 psi is the lightest cylinder for the job.
You may be asking, why wouldn’t I reduce the bore of the 5000 psi cylinder to make it lighter. (Very good question BTW) The answer is buckling. The rod size needs to be 2.5″ on a 3″ bore cylinder. There isn’t much room to decrease the bore. Buckling is a common problem with high pressure cylinders that usually leads to increased weight. One way to mitigate this is to use a hollow rod which keeps the needed buckling strength (high “I”) while reducing cross sectional area.
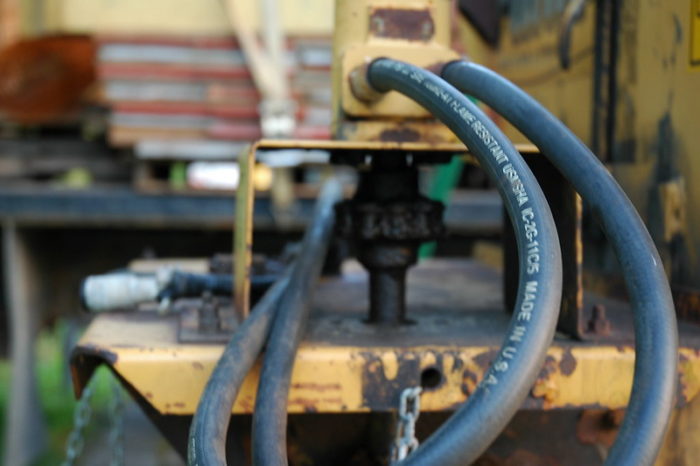
Going to high pressure creates other problems. As you increase the pressure, you increase the stiffness of the hose. This makes hose routing more complicated when moving parts are involved
If you are using a hose carrier, note that the bend radius will need to increase. This means trouble if you are planning to run the hose carrier inside of a structure.
If going to high pressure is necessary, you will notice that there are far fewer choices of components. Pumps, valves, fittings and hoses will be in short supply. The usually unseen cost of fittings will go up dramatically due to stronger materials with more mass.
Another thing that makes me gag is that many of the fittings are only available in pipe thread (NPT). The use of teflon and proper tightening, especially on 90° fittings, is frustrating. If you make a mistake with the fitting orientation, you need to start all over. I tend to avoid NPT fittings at all costs.
I’ve spent the majority of this article trying to keep your system pressure under 3000 psi. Now we need to focus on when should we go to higher pressures.
There really two main reasons to go to high pressure: to reduce flow to components and better use of accumulators.
Power is force x velocity. In a cylinder, we can keep the force constant by increasing the pressure and reducing the bore. As a result, we need less flow to maintain the same velocity. The benefit here is we can use smaller hoses for the same amount of work.
However, cylinders aren’t the primary benefactors; hydraulic motors are! Running a motor at higher pressures (4500 psi) can significantly reduce the flow and hose size. Above is the drive system for Top Thrill Dragster at Cedar Point. The hydraulic motors turn the large cable drum. The cable system launches the coaster from 0 to 120 mph in 3.8 seconds.
In the picture of Top Thrill Dragster above, you’ll notice the red tanks. Those are large piston accumulators and they make the launch possible by storing high pressure fluid between launches.
Accumulators are complicated to design, but one guiding principle is that they work better at high pressures. If the launch system only operated at 3000 psi (or less), you would need much larger accumulators to achieve this launch.
You will find that keeping the system pressure under 3000 psi (207 bar) will give you access to a wide variety of hoses, fittings, adapters and components. Pressures between 2400 psi (172 bar) and 3000 psi will give you the lightest cylinders. In some cases, you can find these cylinders stocked in local stores or online.
Over the years, I have made and seen some bad hydraulic system designs. For the most part, these have be easily fixed. Others we just suffered through the consequences of bad design. Let’s take a look at the 10 most common design blunders, identify the cause and prevent them from happening again.
Most hydraulic system issues are caused by: using the wrong oil, improperly sized suction lines and hoses, dirty oil with poor filtration, oil that is too hot or too cold, improperly sized reservoirs, undersized flow and pressure and a lack of maintenance.
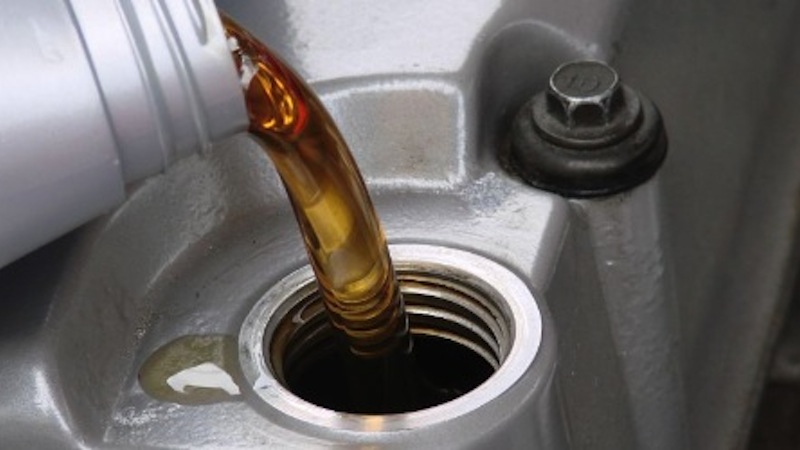
Without a doubt, oil is the most important component of any hydraulic system. Choosing the right oil can mean the difference between long life and constant problems. Oil provides two main functions: it is the method by which work is done and it lubricates the components.
The main factor is the oil viscosity. The viscosity pretty much sets the range of acceptable temperatures for you system to work at. Low viscosity, like ISO 22, will perform much better with cold weather startup. However, the upper limit on this fluid is not very high. If you work in cold climates, your mobile equipment should be be using low viscosity oil.
Conversely, if you are in the desert, cold temperatures may not be an issue, so we need better protection at high temperatures. Here an ISO 46 or 68 oil will be a better fit for your application.
To further complicate things, using a very thin oil will lead to power loss. A thin oil will leak past the components of pumps and motors. This loss of power creates even more heat making the oil thinner.
If your machine is inside and somewhat isolated from drastic changes in temperature, selecting an oil might be as simple as using and ISO 46 oil.
If you have doubts as to what oil you should use, contact your local hydraulics distributor for more information. In addition to viscosity information, they can instruct if there are any additives that may be beneficial.
Hydraulic components are not meant to run dry! They will destroy themselves within a few turns of the shaft if run without oil. A common mistake is to believe that a pump is self-priming or self-lubricating.
Starving the pump of oil can cause component deterioration or cavitation can occur. Cavitation is where the fluid won’t flow correctly and the pump will try to pull the oil in too fast. Small pockets of oil will instantly boil and then cool rapidly from the surrounding fluid. This is like setting of may small explosions in the system.
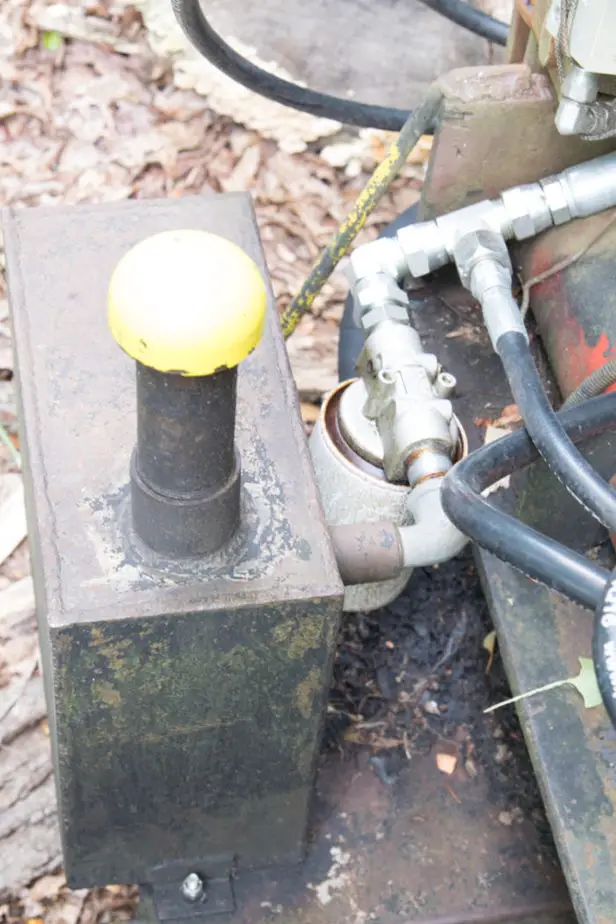
Avoiding this all starts with the location of the pump relative to the reservoir. Whenever possible, the pump should be at the same height as the reservoir or lower. Gravity will help push the oil to the pump.
Design your system for short suction line hoses or oversize them if you cannot. A good rule of thumb is that a suction hose should have a flow rate of 5 ft/s (1.5 m/s) or less. If you have a long run, you may want to pick the next larger size.
We also tend to put more component between the reservoir and pump than needed. Commonly, I see suction strainers, shutoff valves and filters. Once I saw a 5 psi check valve (The client couldn’t explain why either).
My personal preference is to filter on the return line (more on that in the next section) so any filtration here. If you must filter here, be sure that the filter has a low pressure bypass on it. This should be around 3-6 psi (0.2 – 0.4 bar).
Definitely keep the suction strainer in the reservoir to keep the large chunks from reaching the pump. It should also be at least 2″ (50mm) off the bottom so that dirt has a harder chance of getting sucked in.
Putting a shutoff valve is often a necessary evil. Starting the pump with it closed is a surefire way to kill you pump; however, it is handy when you need to replace the pump and don’t want to make a huge mess. I recommend using safety wire or zip ties to secure the valve in the open position. This will prevent most problems.
When you start your car, you want oil already available to lubricate the engine. We want the same for our hydraulic system; the oil already needs to be at the inlet of the pump. This can be done by loosening the inlet fitting after the reservoir is filled. Any trapped air in the line will escape, filling the inlet with oil.
If your pump has a case drain, make sure it is located on the top. Remove the hose and pour a little oil in. Replace the hose.
There are three locations to put a filter. On the suction line, right after the pump and on the return line.
Common logic is that putting the filter on the suction line would be the best. However, this usually isn’t the best way to filter. The first problem is that you can easily starve the pump if your filter gets clogged. A low pressure bypass valve will prevent starvation, but now you will be contaminating all parts of the system. In order for this to work, you will need a frequent PM schedule and probably be throwing away mostly clean filters.
The next logical thing is to put a high pressure filter right after the pump. The pump is most likely to be damaged by contaminates and we have lost the ability to filter them. On top of that, the filters need to be more robust to deal with the pressure and therefore, more expensive.
The problem with suction and high pressure filters is that they do not address the source of contamination; the cylinders. Yup, every time the cylinders stroke, dirt sticks to the oil rod surface. When it retracts, the larger chunks get wiped off. But the small ones, the ones that damage pumps, get ingested into the system and eventually the reservoir.
This is why having a return filter makes the most sense. Having a filter in the other two locations eventually makes the reservoir like the Great Salt Lake. Rivers flow into it, but nothing flows out. It collects everything.
No! We want to keep all components of our system clean. Having the filter on the return line will filter out the new contaminates from the cylinder instantly.
Return filters also have an advantage of a longer lasting filter, because the bypass setting can be higher.
Overheating oil can be a big problem. It deteriorates seals, the oil itself and the lubrication that the oil gives. If your oil is cooked, you will know it by the awful smell. If you are using a biodegradable oil, it may smell like French Fries.
Be sure to look at the manufacturers recommended operating temperatures. Keep in mind that at sustained lower temperatures, the oil may eventually burn.
The trick here is to have a temperature switch on the reservoir that shuts off the system and add an oil cooler if necessary.
You also want to analyze your system to see where the heat is coming from. The main culprits are counterbalance valves, flow dividers and flow control valves. Try to minimize the effects or eliminate them.
After some testing by a partner in Canada, we got a returned pump with a broken shaft. It didn’t take long for us to figure out what happened. Though our oil was rated for colder weather, the oil was very cold and the operator didn’t warm it up before using.
When working with cold oil, you need to allow the pump to circulate the oil at a low flow rate. This can take a while depending on reservoir size and flow rate.
This is practical in milder climates, but unacceptable in cold climates because it takes a while to get the oil warm enough. In this case, you need to add an oil warming option which is usually electrical heat. I’ve seen some systems where a propane system was used to heat antifreeze (many feet away) and a heat exchanger would transfer that heat to the hydraulic oil.
There were two causes to the pump failure. The first is that the operator was running the truck at high idle. The second was that the main relief valve was around 15 ft (4.6m) from the pump outlet. The relief valve opened at the right pressure, but because of the increased viscosity of the oil, the pressure at the pump was much higher.
The two combined caused the pump to be overloaded and the shaft snapped. For this reason, I recommend that a relief valve be mounted as close to the pump as possible.
For one of my first clients, I designed a machine that had 2 large ram cylinders. I had purchased an 80 gallon reservoir and was filling it when I realized, I don’t think the reservoir is big enough. I didn’t understand yet exactly how small it was.
I had sized the capacity with the 3:1 rule of thumb, where the reservoir capacity is at least 3 times the flow rate. But what I did not consider is how how much fluid those cylinders would use; 44 gal. My tank would be more than half empty when the cylinders were extended! The float switch would be triggered on every cycle.
A simple calculation ahead of time would have saved a lot of heartache and hassle. We ended up designing a new tank, that was much wider and the same height. Now, when the cylinders were stroked, the level in the tank didn’t change as much.
Rules of thumb are well….rules of thumb. This one is no different. I’ve designed systems as low as 2:1 and know power steering systems in cars may be as low as 1:6. Is there anything wrong with this?
NO!
The 3:1 rule arose because it gave the oil time to cool before going out for another cycle. This issue can be mitigated by improving the efficiency of your system and adding an oil cooler. The other thing to watch for is running low on fluid. If you are going to go less than 3:1, be sure to install a float switch.
As mentioned above, my ram cylinders took up too much oil and significantly dropped the level of the tank. Since it was a submerged pump, all of the components were mounted on the pumps lid, making it difficult to change the distance the pump was submerged. In this case, it didn’t make sense to relocate all the components to use a taller tank.
Instead, we used a much longer and wider tank to solve our problem.
However, this isn’t a good idea in mobile applications. I once evaluated a tracked crawler machine that had a very long, but short reservoir. When testing the performance on steep slopes, we noticed that oil was coming out of the filler cap. Had we pointed the unit the other way, the suction port would have been too high (it was on one end) and we might have starved the pump.
For mobile applications where tilt is an issue, try to design a taller tank and put the filler cap and suction port in the center.

Often, small hose sizes are to blame for excess heat and poor performance. Often this is seen when cylinders are retracting and the return port sees more flow than the system flow. If the hose is too small, it will take more pressure to move the oil. This creates heat or impedes the motion of the cylinder.
The pressure it takes to move the oil increases with the length it must travel. If your hose run is long, you may want to increase the hose diameter just to keep the pressures down.
Before I acquired my log splitter, I was borrowing it from my neighbor. He had a single stage pump on it with a 6.5 hp gas engine. IT WAS SLOW. Painfully slow. If I were to put a larger displacement pump on it, it would be faster, but not have the required force. This would stall the engine.
However, there wasn’t a clear way to change this without increasing the size of the engine and pump.
Luckily, the pump went out on it and we got the opportunity to improve it. After some research, I found a two stage pump that would work with the gas engine. It provided high flow at low pressures and low flow at high pressures. This sped up the cylinder tremendously.
I usually get burned here by accident. The last time this happened was with an articulating lift device. I had designed the cylinder to be 94% efficient at the intended system pressure of 3000 psi (207 bar). We were using a piston pump to power the unit that was capable of a maximum pressure of 3000 psi. What I didn’t realize is that this is the standby pressure and not working pressure. The difference (margin pressure) was 250 psi (17 bar). Once friction in the cylinder and joints were factored in, I needed about 2800 – 2850 psi (193 -197 bar) to lift.
CRAP! When this function started to lift it was slow! Once the articulation got to about 15° though, the pressure had dropped to below 2750 psi and the cylinder would perform normally.
In this case, I should have designed to the working pressure of 2750 psi (190 bar).
We ended up solving this problem by increasing the cylinder bore by 1/4 inch (6mm).
Oil cleanliness is the leading cause of system failure. We’ve already discussed how to design for good filtration, but those filters need to be changed. Here’s where a good preventative maintenance program comes into play.
Oil right out of the barrel is not going to meet your cleanliness standards. If your system requires high levels of cleanliness, you may want to use an external filtration system before you fire up the pump.
Most cases, it is sufficient to let the pump idle and filter the oil naturally. This is easy to do with an open center system. On a closed center system you may need to manually open a path to tank. You’re going to catch the most dirt in the system in the first few hours or days of use. I recommend that you swap out the filter after a week. In a previous job, we made mobile trucks and would change out the filter right before we sent it to the customer.
After that, get this on a preventative maintenance schedule. This is going to depend on your duty cycle and operating environment. If this is unpredictable, take oil samples once a month. When you notice that the filter is clogged, in bypass mode or the oil is too dirty it is time to change the filter.
There’s a tension that exists between not ever changing the filter and changing it too often. I would lean toward changing a mostly clean filter rather than having issues with component failure. The small cost of a filter usually outweighs troubleshooting a system and the downtime that comes with it.
Finally, when you do need to service a component or fill the tank. Clean! We don’t want to introduce dirt into the system during service. So take a few minutes to wipe down all the surfaces with some industrial cleaner before breaking a line. Be sure to look for sources of debris that may fall from above like overhead cranes.
Feature image by Simon Speed, CC0, via Wikimedia Commons
I was over at my neighbor’s house watching him split wood. His father and uncle had built this log splitter nearly 20 years ago. Being that this was some redneck engineering going on, it worked, but was incredibly slow. It took forever for the cylinder to retract and even longer to extend.
At the time, I was studying for my hydraulic specialist certification and just learned about regenerative hydraulic circuits. I wanted to use it. I offered that I could speed up the system if he would let me borrow it from time to time. He agreed.

A hydraulic cylinder can extend faster with a regenerative circuit at the expense of reduced extension force The entire cylinder can be sped up with the addition of a two (or more) stage pump. A multistage pump will offer high speeds at low pressures and low speed at high pressure.
Let’s explore this hydraulic voodoo magic!
Question: What happens when you pressurize both ports of a hydraulic cylinder?
If you said,”Nothing, it will have equal pressures on both sides of the piston,” you would be wrong. You do have equal pressures but you don’t have equal areas. The areas on both sides of the pistons are calculated below.

So the resulting motion is the cylinder extending with oil flowing out of the rod end and back into the barrel. This oil from the rod is the regenerating fluid from where the name of the circuit comes from.
Since you’re smart, you probably already noticed that there is a trade off: loss of force. When you pressurize both sides of the cylinder, the annulus areas cancel out and you are left with just the area that the rod takes up. This reduces the available force to the pressure times the rod area. So there is a definite trade off.
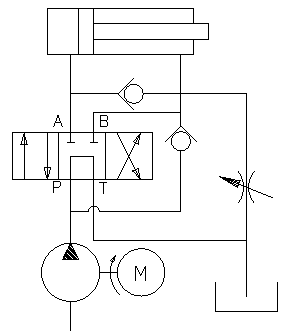
A couple of well placed check valves can turn any hydraulic circuit into a full time “regen” circuit. As the cylinder is extended, fluid flows into both ports of the cylinder. The oil must flow out of the rod end, but cannot flow directly back into the barrel end. It makes its way through the other check valve and combines with the inlet flow. Viola – extra flow for the barrel end of the cylinder.
When I shift the valve to reverse, the circuit functions as normal.
The major downside to a Full Time Regen Circuit is that it is full time. I don’t ever get the maximum force available from the cylinder. In applications like my log splitter, I need that force.
There are a few ways to slice this pie. The easiest is to add a needle valve on the rod port. This will drain off the pressure and allow the barrel end of the cylinder to create more force. However, a substantial amount of flow is needed, aka wasted, all the time and it slows down extend speed.
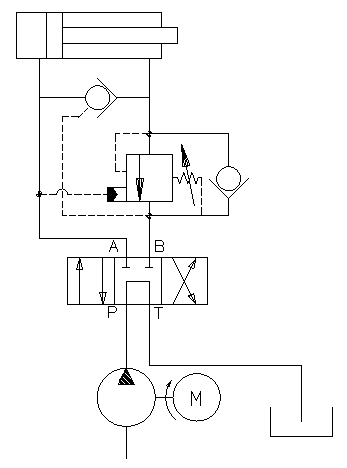
Using a counterbalance valve is a better way to go. At low pressures, fluid will flow from the rod to the barrel through the check valve. (Note that the check valve orientation is reversed from above.) At higher pressure, the barrel pressure will open the counterbalance valve and dump all of the rod flow to tank once the set pressure has been exceeded.
If you want to get fancy, you can use a 4 position 4 way valve. Three of the four positions will work normally, but the fourth position will have the regenerative circuit. With the extra position, you can determine exactly when it is necessary to have the regen circuit.
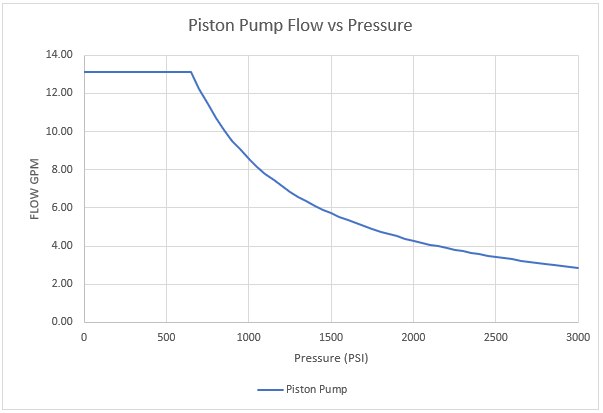
Ideally, we would want our pump to put out the maximum flow available for the prime mover’s rated horsepower. The only way to get that is to use a variable displacement piston pump in combination with a torque limiter. This is expensive $$$! A typical pressure flow chart for a torque limited piston pump is show below. (Note that power = pressure x flow.)
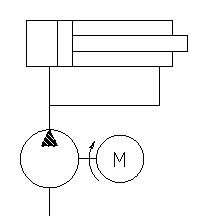
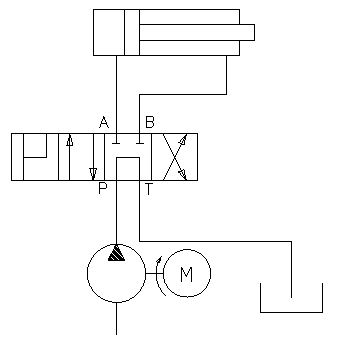
The solution is to use two or more cheap gear pumps and turn them off at higher pressures. Ok, so we don’t actually turn them off; we simply dump the flow to tank or recirculate it back to the inlet (shown below).
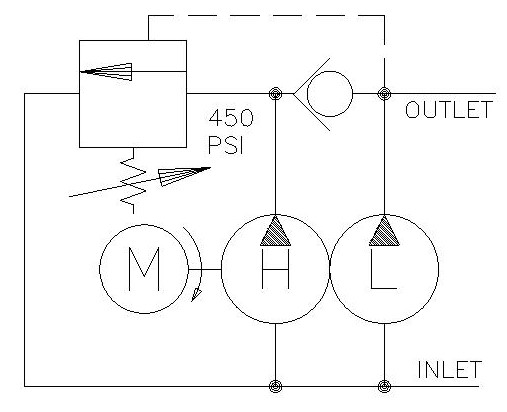
We can see that our two pumps are always connected to the shaft and our motor or engine will turn the shaft. The pump on the left is the high displacement or high flow pump and the one on the right is the low flow pump. Since they are gear pumps, every revolution produces the same amount of fluid in the pressure port. At low pressures, the two flows are combined at the outlet as the high flow pump moves oil through the check valve. This gives us our high flow rate.
In a log splitter, this would be used to run the system right up to the log that needs splitting. As the cylinder starts to exert force on the log, the pressure will build. At the current high flow, even medium pressures will stall out the motor. It is time to turn off the high flow pump!
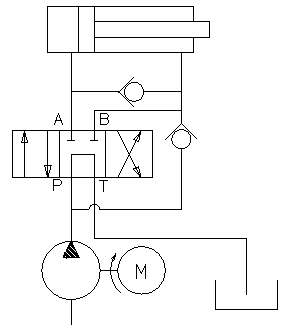
Luckily, turning off the pump is quite simple and only involves two components: a check valve and an unloader valve. The check valve is there to keep the higher-pressure oil from the low flow pump separate from the oil in the high flow pump. The higher-pressure oil from the low flow pump will shift the unloader valve by compressing the spring. This allows flow from the high flow pump to return to the suction line of the pump.
Many pumps have this return line internal to the pump, so there is no additional plumbing needed. At this point, the high flow pump uses little to no power to perform this action. You will notice that the cylinder speed slows dramatically. As the log splits apart, the pressure may drop causing the unloader valve to close again. At this point, the flows will combine again. This process may repeat several times during a single split.
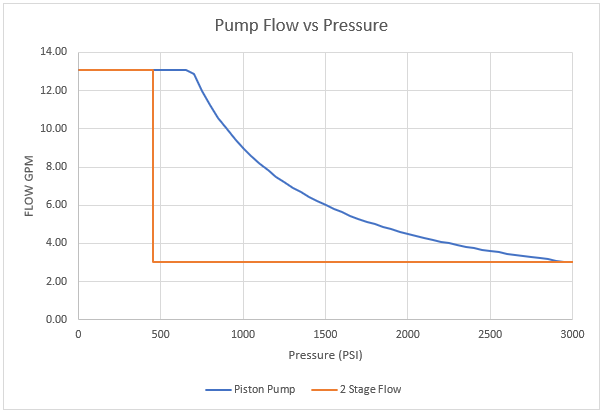
The chart above shows the performance curve of the piston pump and a two stage pump. The two stage gives high flow at low pressures and low flow at high pressures. Easy and cheap.
For more information on two stage pumps, check out this article.
Using a two stage pump can have undesired complications. For example, my log splitter has a jib hoist on it as well that is hydraulic powered. When I am lifting or lowering the load, I might see a change in speed when the high flow pump cuts out. If I am operating in this unsafe condition shown, a sudden speed up could have disastrous consequences.
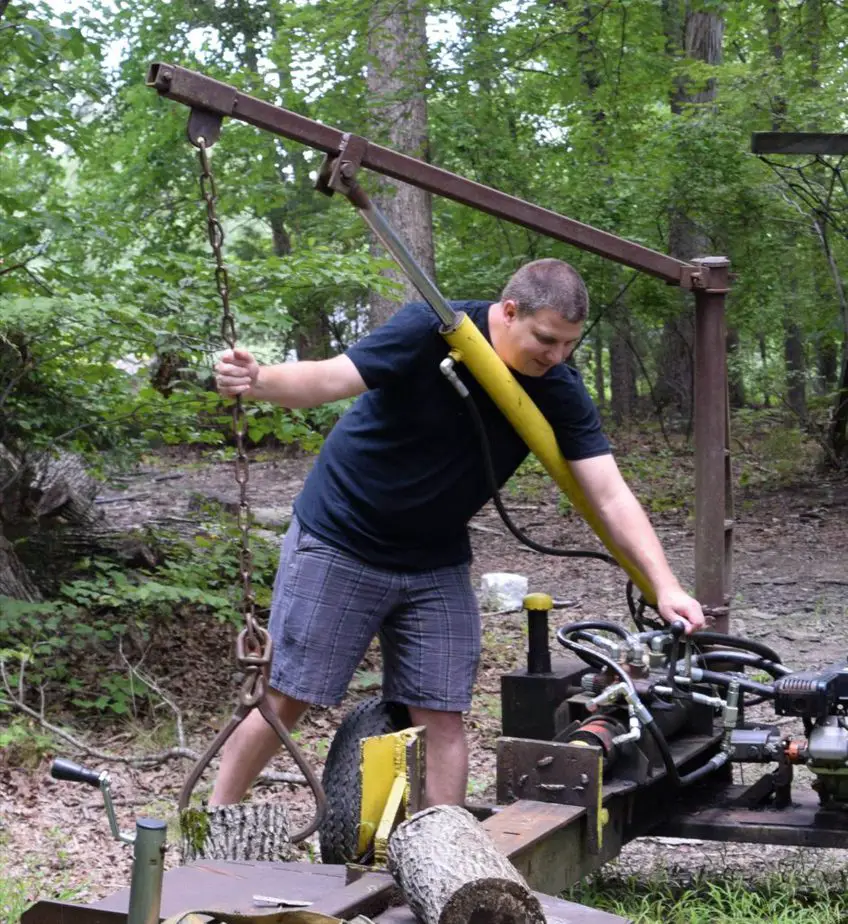
In order to mitigate that risk, I installed a counterbalance valve on the jib cylinder (it should have one anyway for load holding). The weight of the jib and load is enough disable the high flow pump. The c/b valve mostly helps with the lowering because it requires higher pressure to allow flow from the barrel back to tank.
I set the pressure so that it needs 1000 psi to lower the boom which is well over the cutoff for the two stage pump.
My log splitter performance was greatly improved by adding a two stage pump. I have also considered “upgrading” by adding a part time regenerative circuit using a counterbalance valve. This would help improve performance and speed up the process. I don’t know if it is financially worth it…..
If Megan getting stuck wasn’t bad enough, we now have foot long missing section of track. And no, the cart can’t jump it.
This video detail what happened, what the root cause is and how we are going to prevent it from happening again.
In early 1869, the Transcontinental Railroad was nearing completion in northern Utah. The Central Pacific Railroad was building from Sacramento, California and the Union Pacific from Omaha, Nebraska. The railroads and the workers were paid by the government per mile to complete the line. No one really had an idea on how the rails would unite…so they didn’t. Both railroads kept grading and laying track right past the other sometimes coming within 100 ft of each other. Why not? They were getting paid.

Working with a contract engineer can often feel the same way. You have the same goal, but entirely different viewpoints on how to get there. Without careful planning, you can end up in the same situation.
In order to hire the right consultant, you need to clearly define the problem, understand the benefits to your company, be flexible with the deadline, make sure that you can’t do the work in house, hire the best consultant you can find and check references.
A good consultant will have experience in the field needed or recommend you to someone else, indicate how future change orders will be handled and try to talk you out of working with them throughout the conversation.
I have been a contract engineer for nearly 10 years (as of this writing). Most of that time was with a firm. We noted time and again that the largest obstacle to a successful project was in clearly outlining the project.
This is extremely hard to do. The client usually has a general goal they want to accomplish, but it usually isn’t written down and very vague.
I am reminded of a friend that hired a virtual assistant to setup an interview with a semi-famous person. Sounds simple, but the VA (in India) spent nearly 20 hours trying to do this. How can that be? Its a simple phone call or email. The problem was in the word “interview”. My friend was thinking podcast interview and the VA was thinking job interview. No wonder it didn’t work.

If you have hired anyone before you know this situation. Going through the difficult and rigorous process of clearly specifying the project goals and your own internal requirements. Your company has lots of tribal knowledge and you don’t realize it. Here is a list of common things that are overlooked.
This list is in no way exhaustive, but it will get the juices flowing to communicate the needed things.
I must mention here that in order to have a good working relationship, please don’t bury the consultant in a mountain of paperwork. At a company I worked for, we hired a consultant and sent all the applicable standards (over 10) to them and expected them to know and understand every part. This was an unreal expectation.
The project was going smoothly until Finite Element Analysis was run on the project. A portion of one of the standards outlined a specific way to do the FEA and it was overlooked. Our company was not happy in the results and the relationship was severed.
In the end, both parties were to blame. My point here is that if you have expectations for things, make them absolutely clear to the client and don’t bury them in a mountain of paperwork. This will save time, money and the relationship in the long run.
As you define your project, evaluate what parts of the project are in scope and which are not. Once in the project, things tend to creep into scope and the project ends up being larger than it was at first. If you are being billed on a time and materials basis, this can get expensive when you go down multiple rabbit trails.
Recently, I took on a client that wanted a machine that matched or exceeded “current market standards”. While I know what they were desiring (specific machine specifications), I didn’t know exactly what their market is because I was many time zones away. I challenged them to talk to their potential customers and find out exactly what kind of machine was needed before we proceed.
A few years back, I worked with a client who wanted me to come up with some “concepts” for solving a problem for his client. For most engineers, a concept is usually not much more than drawing on a napkin at the bar or a few doodles on a dry erase board.
I quoted him the number of hours I believed it would take me to give several concepts to solve his problem. He accepted and I got straight to work and developed around 8 concepts, scanned them into a file and delivered them to my client.
He was not happy. It turns out that he wanted CAD models of each concept (or at least the best 2) and not the nice colored pencil sketches I delivered.

His definition of “concept” and my mine did not match up because they had not been defined when I made my estimate.
It can be difficult to understand the value an engineering consultant can bring to your company. Many times the benefits won’t be known until the project has started. I once interviewed at a manufacturing shop where the manager was complaining about the wasted time to transport a heavy part over to a milling machine and then bring it right back into the process. Being an outsider, I simply suggested moving the milling machine; I was offered the job on the spot.
Engineering consultants bring value to your company in many ways that aren’t usually obvious.
We all have blind spots, so as you talk with a potential consultant, ask where they will bring value to the project.
I once headed up a project with a firm 19 week deadline so that the new machine could be showcased at a trade show. We delivered on time, but we had to throw lots of extra resources on the design and fabrication. This lead to more money being spent than need be. The customer was not thrilled at the cost of the project especially since the machine did not meet the customer’s expectations. (See Tip #1)
I have found that having firm timelines in your design will cause you to be over budget consistently. Yes, we all want to get to market fast, but they are not always as firm as we think they are. Is it worth the extra effort and money it takes the consultant to meet your deadlines?
As a consultant, I am very concerned with how I spend my billable hours. Often, I find myself stopping work to ask questions as to the direction of the project or even for a sanity check on my progress before continuing. On many occasions, this pause in the work paid off because I was not going in the right direction and I ended up saving the client thousands of dollars.
I often compare hiring a consultant to hiring a plumber. I’m pretty handy and can do some basic plumbing. Over the years, I have gained more and more skills, but I am not a plumber. With some effort, I could train to become a plumber, but I don’t want to.
If you don’t have an engineering department, chances are that your company wants a product designed or has a specific problem that needs to be solved, like production bottlenecks. Hiring a consultatn is the obvious choice.
If you do have an engineering department, you need to ask yourself why you need outside help. If you just need more help in the short term for a project, you probably just need to hire some contract engineers and train them in house. (This is the study to become a plumber route.)
Many times though, your engineering group does not have specific skills. At one job, we brought in a fastener expert even though we had a whole team of mechanical engineers. He was worth it because he had dealt with the exact situation were were in many times. In cases like this one, hiring a consultant for specific skills is essential. It is the equivalent to knowing that you are out of your league and hire a plumber.
In both cases, it is still going to take a significant amount of time to manage the project; you either need to spend time on-boarding new employees or make sure that the consultant is on the right path. Generally, this will take around 30% of the project to do. We often don’t bring on new personnel because most of these hours are upfront. We justify it with “if I just work 1 more hour a day I could do it myself.” That’s great, but there are only so many hours in a day.
Before hiring a consultant, ask yourself if you can do the work, if you can grow the team or a team member’s skill set or if you really need to find “the best.”
Many companies think of a consultant as a temporary employee. STOP. They are not contract engineers, they are experts in their field. Moreover, they are free! Let me explain.

I say that the experts are free because they will want you to be successful and bring in far more money than what you are paying them. Having a committed member of the project is far better than finding a hired gun.
If your potential consultant doesn’t seem committed to your success, don’t hire them. You won’t regret it either.

This should be a no brainer. You would check the references of employees, why wouldn’t you do it now. Be sure that as you do your due diligence to focus more on experience rather than education. Having a master’s or doctorate degree doesn’t necessarily make you the best consultant.
When I first started out as a consultant, I was working on a fairly large project with an engineering intern. As we started to assemble the large pieces together, he was remarking about how it was all going to together so well. He asked, “did you know it was going to go together this easily?”
“Yes! I wouldn’t have stepped out on my own if I doubted my skills,” I replied.
As long as your project is in the core competency of your client, they should have plenty of experience to show you.
This is the question that separates the experts from the general consultants. If the consultant is an expert, he will have specific skills pertinent to your project. This may be previous design experience, access to needed software or references, specific knowledge of applicable standards or industry best practices. It may also be the way they communicate or write reports.
If your candidate seems underwhelming, you may not have the right person for the job.
Engineering changes will happen without fail. Your contract needs to communicate how this will happen on an ongoing basis. Sometimes changes will occur during the project project and it is simply part of the work. Other times it will be a little trickier, as in long term support.
I once designed a machine and there were a few problems getting it running smoothly after the project as mostly complete. Quite a few times, I received a phone call to troubleshoot in the middle of the night. I was more than happy to help. But after the third time, we had a discussion about my availability and expected response times.
Another issue is general availability. Contractors and consultants usually have multiple projects going on at the same time with varying priority. He may not have the availability to help immediately. I have been contacted several times while on location at another client or on vacation and was not able to help as much I would have liked. Being limited to phone calls and emails makes it difficult to troubleshoot problems and propose solutions.
Discussing your expectations for support and changes needs to be done early on. You may find that there are higher rates for “after hours” work that you did not plan for.
Another sign that your consultant is an expert is that they will tell you when they cannot be of value to you or your project. Its kind of surprising, but refreshing at the same time.
Being smart is knowing what you don’t know. This seems like an oxymoron, but it isn’t. I don’t know biology or chemistry, so I don’t work on projects that do. I have more education in HVAC and thermodynamics, but I have no experience in power plant design. I will not add value to your project.
An expert won’t travel outside of his core competencies just to get another client. He should tell you exactly what he is and is not capable of doing. Most experts will also have a list of other experts that can fill in when needed. If they don’t it might be a red flag.
All this is to show that they want your project to be successful over winning a new contract.

Money is one of the last things that should be discussed when hiring a potential consultant. If this ranks high on your priorities, you probably don’t see the value in what the consultant brings to the table. In my experience, the project will probably take much longer and you will spend much more on the wrong person.
Many projects are done on a time and materials basis. If you have done this previously, you know the issues:
None of these lead to a healthy working relationship. Let’s see how fixed costs change this working dynamic.
Budget overrun is eliminated because the work in the scope of the project is a fixed cost. Whether the project takes us 20 hours or 2000 you pay the same amount. Undercharging is our problem, not yours.
In order to give an accurate bid, we will need to have a well defined project scope. A well defined scope forces both parties to talk about the end goals, project values and outcomes desired. Having these well defined at the start of a project always leads to client satisfaction. This also prevents overly extravagant proposals and replaces them with common sense solutions.
Fixed costs promote a partnership between the contractor and client. With a well defined scope and cost, a level of trust develops between the parties because even if the project takes twice as many hours to complete, it will cost the same. There will not be tension if you believe that we are not as efficient as we should be and think that we are “milking the clock.”
Finally, additional phone and email contact will be part of the contract. We welcome you to share your thoughts and concerns about the project without hesitation.
In many projects, I have looked back and said, “I wouldn’t imagine that the solution would look like this.” It is impossible to quote a fixed cost for the entire project when you can’t see what the end looks like from the beginning. Unfortunately, many projects switch to time and materials at this point.
But, let’s back up for a minute. We can definitely break up a project into sections that we could see the end from the beginning and quote each of those as fixed cost projects. For example, the first stage of a project could be simply to come up with 3 or 4 concepts that could solve the problem at hand. From there we could decide on one and develop if further.
I have found that most projects can be broken into the following stages; concepting, preliminary design, detailed design, final design and implementation. In each stage a clear scope and goal can be set and a fixed cost can be quoted.
Selecting a consultant can be a very challenging endeavor. It takes a leap of faith to hire an expert who may or may not be able to help you achieve your goals. Using the tips above will help make that leap smaller and give you confidence that you made the right decision.