This video show that movement of a chain tensioning device used on a roller coaster chain lift. There is something abnormal about the loading and unloading motion that we see. Let’s look at the science of what is happening here.
Video-Why a Two Stage Pump is Better For Your Log Splitter
Yes, planetary gears can even be found in pencil sharpeners. This is an unusual situation because there is no sun gear in the system. Also, the carriage is input and the planets themselves are the output.
Let’s explore this unique creation that has been right under our nose for years.
It’s no secret that planetary gears have many uses. As a result, they are widely used to get various speed reductions (or increases). In this video, we will show how small changes can make large differences in the speeds of the same planetary gear set.
Welcome to the Mentored Engineer. In this video, we’re going to talk about planetary gear systems and specifically two different ways of getting multiple speed power transmissions using the same gear sets and only making small changes in between each one. So let’s look at this video. And in each case, the arm is moving one revolution. Yes, the carrier is only moving one revolution, but the output is different.
So why is that? Hey, keep watching this video and you’ll find out. Hey, if you like what you see so far, please be sure to smash that like button and subscribe and click that notification bell so I can annoy you at least once a week. So let’s look at the gear apparatus.
In the apparatus, we have three different sun gears mounting on the same shaft. We also have three different sized planetary gears and three different sized internal ring gears. All right. So how does all this work together? Well, first of all, all the ring gears are essentially bolted together.
Somehow they’re they’re bolted, glued, you got roll pans, whatever, keeping them all together. So they all turn at the same rate. Now, the sun gears aren’t actually attached to the shaft. They’re just circling on it. The planetary gears are then sized accordingly, just to say on the same shaft of the carrier.
So in the first stage with the smallest sun gear, that’s going to be 24 teeth on both the sun and the planet. And the ring will have 72. We can use our simple equation to find out that we need a 72 tooth ring gear. to make all this work. On our second stage, we have 30 teeth on the sun gear, 18 teeth on the planet and 66 teeth on the ring gear.
So in all these cases, we had to keep the same physical distance between the center of the sun and the radius of the carriage the same so that we could mount all of the planets on one single straight pin. If the planet size was varying differently with that, we’d have, you know, step pins and I really don’t know how you design, manufacture and assemble that. So we kept the same diameter there. As a result, the second stage ring gear is actually six teeth smaller than the first stage at 66 teeth.
As we go to the third section now, we’re going to have 36 teeth on the sun, 12 teeth on the planet and 60 teeth on the ring gear. All right, so we have three different ratios at play here. Now, I bring this up because a lot of high end bicycles will actually use a internal planetary gear style transmission instead of having the typical chain derailleur where you have multiple size sprockets and then the chain goes over it and then you have the little derailleur to pull it side to side. Those are you know, it’s a proven technology, but they do have their quirks and their problems, and they need to be calibrated from time to time.
However, if we make this simple change here, we can get three gear ratios out of this. And what happens is we will lock a sun gear in each one of those cases. Now let’s look at this from the manufacturer, Shimano, of one of these internal gears, and they will show you a little bit about how they interlock with the shaft. Within the gear carrier are three sun gears of varying size and matching stepped planetary gear sets. These planetaries drive a ring gear on which is mounted a roller clutch which transmits power to the hub shell.
Going back to the introduction, the larger the sun gear in relation to the ring gear, the greater the differential in speed between the units. The sun gears are engaged by means of rising pawls, which are actuated by the shifter through an actuation arm. In order for power to be transmitted to the ring gear, one of the sun gears must be coupled to the axle to become the fixed reactionary gear. Sun gears not coupled to the axle are free to rotate and will not function as a reactionary element. So that’s a really cool idea.
I would have never thought of that on my own. So kudos to Shimano and everybody else that’s doing that. So let’s talk about our system here. And we are inputting on the carriage arm and we’re outputting on the ring gear. So let’s look at the details of our first section here with the smallest sun.
When we lock that, we’re going to notice that as we input one revolution in the carriage, we actually get 1.33 revolutions on the ring. Now, if we were to back drive this and drive the ring as the power input and the carriage as the output, we would get the inverse of that. So it’d be 1.33 input revolutions to one output revolution. When we lock the second sun, we actually get a 1 to 1.45 output. And when we lock the third one, we get a 1 to 1.6 output.
So each time as the sun gets bigger, we actually get a step up in our output ratio. That can be useful. Now in the bicycle example here, there’s a lot more complication and generally you want more than three speeds. All right, so the first thing is, is you got a back drive. uh or coast at least so if you’re not pedaling you don’t want the pedals be you know forcing you to move your legs uh that’s a good way to get an injury or you know cause an accident or something like that
so you got to be able to back drive or just not pedal coast all right the other thing is is there’s actually a secret fourth gear Yes, secret fourth gear. The fourth gear comes in to play as if you have another mechanism there that locks the carriage and the ring together. This can be done a number of ways. If you simply lock the planetary gear from rotating, great.
Now you’ll have to release the sun gears from being locked as well, otherwise you’re going to bind the whole thing up and, you know, parts are going to fly everywhere. So that’s the first type of transmission. All right. So all that is good and well on a bicycle. It’s a little bit different on a car.
Car transmissions have to be more robust, heavier duty, and it’s really hard to lock the sun on a shaft that’s really small. So cars treat it differently. First of all, their input is going to be the sun and their output is going to be the carrier. And they’re going to use the rings to control the speeds. So the rings are all necessarily just free floating in the automobile when nothing is happening.
Alright, what’s going to happen is there’s going to be clutch pads on each ring gear that will lock the rotation of the ring so it won’t be able to move. So the outside can of the transmission is going to force the ring to be stationary and then that’s going to cause motion through the transmission. So you can see here from this picture, there’s another difference in how these automatic transmissions work compared to the bicycle one. And you can see in the three stages here, the ring gear is driven by the planets in front of them.
So the carriage output of one ring system is now the the the input on the ring. And that allows us to have multiple speeds as well. So let’s look at how the system is constructed. You can see here that there are three sun gears mounted to the input shaft. So you have a ring gear that’s not mounted to anything.
But the next stage, the planets are mounted to the ring gear. And consequently, this third stage after that has the planets mounted to the ring gear. So when we look at how this transmission functions, our gears are going to go from right to left. So when we engage the rightmost clutch, that’s first gear. But we’re going to get a speed ratio here of one to a quarter revolution .
So one revolution input, one quarter of a revolution output. When we go to the second gear here, we’re going to clutch the middle ring and stop that from rotating, and we’re going to get a ratio of one to 0.44. So our speed is increased. That’s going to be second gear. and on our third one we’re going to break the left most ring and that is going to cause us to have our highest ratio which is 1 to 0.58 revolutions so as each time we’re going we’re increasing our speed now also with this we have a secret fourth gear where we could actually lock the input shaft to the output shaft and get a one-to-one and we can do that variety of ways, locking the planetary rotation and not having any of the clutches in there.
But most automatic transmissions don’t do that. They have their gears timed specifically for the values that they want. now obviously this is not all of an automatic transmission because you have generally you know four to five gears plus a reverse uh some transmissions have you know 12 speeds now so there’s a lot more that goes into it than this but this is the basics of how you get three different distinct gears by simply making a few changes Hey, well, thank you for watching this video on planetary gear systems. I hope it was informative and please give it a like.
And if you’re not a subscriber already, please subscribe to the channel. It helps the channel grow. Thank you very much.
Video-How to Use Planetary Gear Systems for Increased Torque in Drills
Planetary gear systems are primarily used for one or more of the following reasons:
Reverse Motion
Transmit more torque than one gear set will allow
High reduction rates
Use with other sets for multiple speeds
Input and output need to be coaxial
Using a planetary gear system in a cordless helps to decrease speed / increase torque all while keeping the shafts coaxial. It also has a function that allows the ring gear to slip when the torque exceeds the desired limit.
Multiplying large numbers is difficult. Any 4th grade math student will tell you that! When you learned how to multiply large numbers, it probably looked a little like this. Personally I never liked the way we were taught to multiply numbers, because the multiplication was complicated with steps of addition. After that everything is added again. It’s rubbish.
Traditional Addition
This is complicated because larger numbers require you to carry digits over to the next column.
There has to be a better way! There is.
Line Multiplication is a visual method to multiply numbers by drawing lines and counting the intersections. Intersections are added up for the proper result. This simplifies the multiplication into one step (no carrying numbers) and addition in another. The lines can replaced with a matrix, eliminating drawing and counting.
Line Multiplication
Line multiplication is a trick that allows you to multiply numbers by simplifying and visualizing the problem. In this method, lines are drawn for each digit of each number.
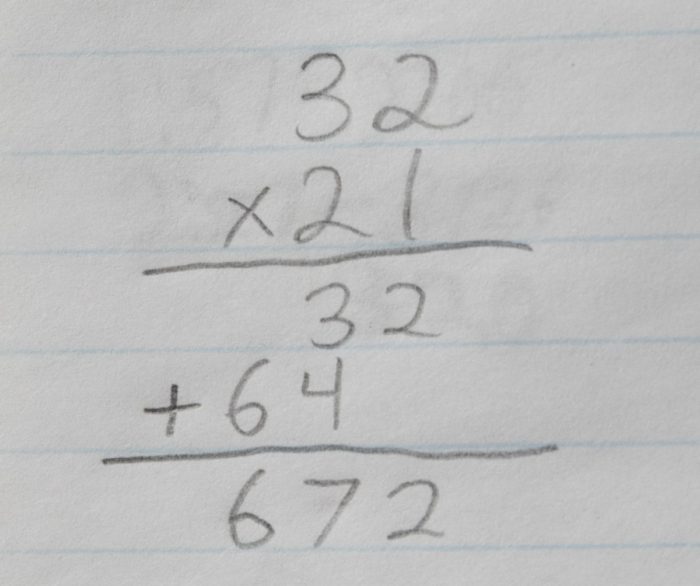
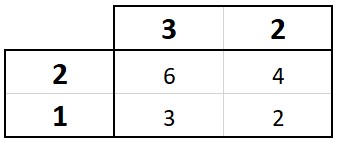
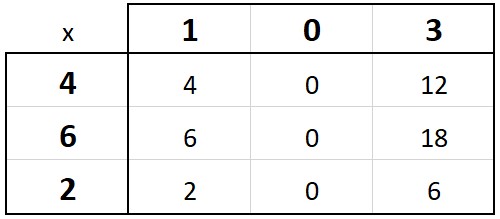
In this case, we will use 32 x 21. One number will be represented with vertical lines, the other will have horizontal lines.
Drawing Lines to Represent the Numbers
The real trick is in how the counting is done. We will count up each group of line crossings. When we count the intersections, we get 6, 4, 3, 2, when we count left to right and then top to bottom.
We will then divide these into three categories representing the ones, tens and hundreds group. The top left section will go in the hundreds category, and the bottom right will go in the ones category. The other two groups will be combined in the tens category. These are the diagonal groups.
Hundreds
Tens
Ones
6
4, 3
2
We will then write out the solution of combining (addition) any single groups and then smooshing them together. In our example it is 6, 4+3, 2 or 672. A quick check with a calculator may be necessary for you to believe. Believe!
This is a great trick, because it relies less on complicated multiplication and more on simple addition. But it has three main setbacks that impede its widespread use. I’m hoping to change that.
Problems with Line Multiplication
Numbers with 0
The question here is how do you draw 0 lines? If you want to multiply 103 x 462, how do you keep those straight? You can leave a space on the paper and hopefully you will remember there is a gap. Another alternative is to use a different color line to represent a 0 and then not count them for the result.
Numbers That Multiply to Greater Than 9
You can see from the example of 32 x 21, that none of the individual numbers can multiply to greater than 9. This was by design so that you wouldn’t be confused early on. The method still works for numbers greater than 9, but it does take some knowledge of how to deal with them.
Large Digits
Drawing out more lines than 5 or 6 gets tedious. Furthermore, who wants to count the 72 crossing when 8 and 9 lines intersect. Count me out. This is the very reason we learn multiplication in the first place.
Improving Line Multiplication
Hopefully, by now we can see the line multiplication reduces the complexity of the multiplication to what we learned in our times tables. We also shift to using more addition. There is no argument from me that addition is much simpler than multiplication.
I think that the real simplification comes from having a clear separation between the addition and multiplication steps.
So how do we get eliminate the complexities of line multiplication and get it to where the process is useful. Simple, we eliminate the lines!
When I drew the lines for 32 x 21, I realized that we were really just making a matrix of simple multiplication. If we change our thinking from drawing lines to making a matrix, we can eliminate the drawing and counting. That’s a huge time saver.
This solves the problems of numbers with 0 because a “0” in the matrix would give a row or column of zeros. Also, doing the multiplication eliminates the need for counting large numbers in a group.
When using the matrix, the diagonals are any squares where only the corners touch when moving from bottom left to top right.
Adding Number Larger Than 9
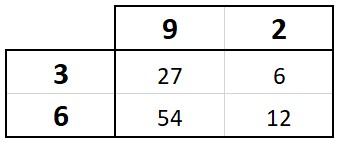
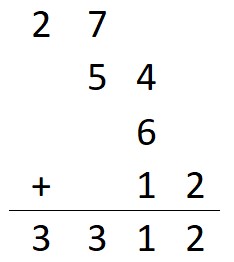
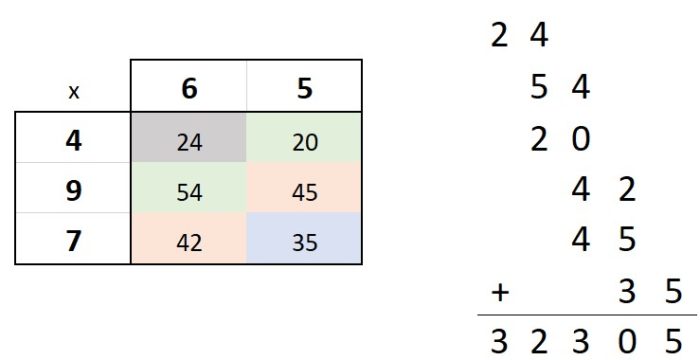
The trick to adding numbers larger than 9 is how they are placed in the addition step. To explain this, we will use the example of 92 x 36.
Creating the matrix we get the following. As you can see, I’m glad we didn’t use lines for 9 x 6. I don’t want to spend the time counting something I already know the answer to.
The trick is remembering which group each number belongs in and keeping it in the right order. The ones group is 12, the tens group is 54 and 6 and the hundreds group is 27. For each group we (right) indent one digit and then add together.
You can see the the 12 was placed in the bottom right, with the 6 and the 4 in 54 above the 1 (one indentation for the tens). The 7 in 27 was placed above the 5 (two indentations for the hundreds). Then we add like any other math problem.
Three (Or More) Digit Numbers with Zero
You may be asking, “What do I do about larger numbers?” The answer is keep adding the diagonals up together. No matter how large the matrix formed is, you will separate the diagonals into categories. Each diagonal is counted as you move from bottom right to top left will add another category of to the solution (This is the one, tens, hundreds….). Each element in a category must touch at the corners.
Let’s work through the example of 103 x 462. When the matrix is filled, we have an entire column of “0” because of the “0” in 103.
Since we have 3 digit numbers, we will have a 3 x 3 matrix. As a result, we will increase from 3 categories in the 2 x 2 matrix to 5. We will now have a thousands and ten thousands category.
Category
Numbers
Ones (yellow)
6
Tens (blue)
0, 18
Hundreds (peach)
2, 0, 12
Thousands (green)
6, 0
Ten Thousands (gray)
4
Matrix dividend into 5 categories
It is at this point that we can start to add things up. We have two unique things that are happening, but don’t get worried. First, we are going to ignore the zeros. Second, when there are no digits to carry over, we will add them in the same line.
You can see that three times we added numbers to the same line because there were no digits to carry over. The first time was placing the 18 right in front of the 6 for the ones and tens category. The second and third time was placing the 6 (thousands) in front of the 2 (hundreds) and the 4 (ten thousands) in front of the 6.
Unequal Digit Multiplication
So far, we have only done examples when the factors (numbers being multiplied) are of equal digits. Often, you will have factors of unequal digits and we need to know how to deal with that.
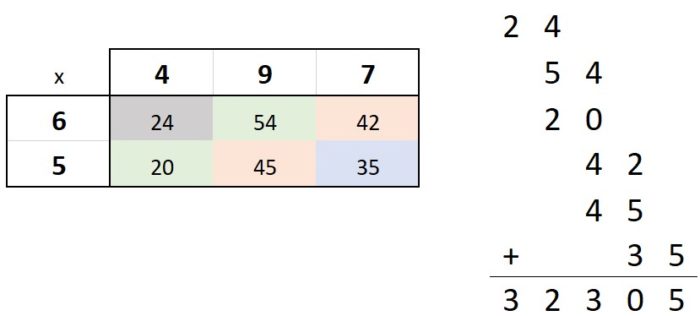
Using the example of 65 x 497, we have a 2 digit and a 3 digit factors and will end up with a 2 x 3 or 3 x 2 matrix. The process still holds up and it doesn’t matter which factor is horizontal or vertical. We will still divide the diagonals in to the appropriate category and then add them together.
In either case (see problems worked out below), we end up with the tens diagonal containing 42 and 45. The hundreds diagonal will have 20 and 54.
Conclusion
As you can see, line multiplication is an interesting concept, but has a few short falls: drawing “0” lines, carrying digits and counting numerous crossings. Transitioning from lines to a matrix, simplifies the process. Here is a summary of the process.
Arrange the factors with one horizontal and one vertical
Fill in the matrix by multiplying each digit in each number. (Should never be higher than 81)
Starting with the bottom right corner, divide the matrix into categories of ones, tens, hundreds, etc. This is done on a diagonal from bottom left to to top right where the terms must touch corner to corner.
Starting with the ones category, begin to add the digits. As each new category is introduced, it must be indented one digit from the right.
Add to get your solution.
Using the matrix solution allow one to quickly and easily multiply large numbers. It is a great tool and I am surprised that it is not taught in school.