Recent Posts

How to Select the Best Plating for your Fastener

To quote my mentor, C. Marvin Franklin, “Bolts are Magic.” This is true! In the world of engineering, bolts simply are magic. They allow us to complete many projects and serve us in a variety of ways, which are vital in everyday applications.
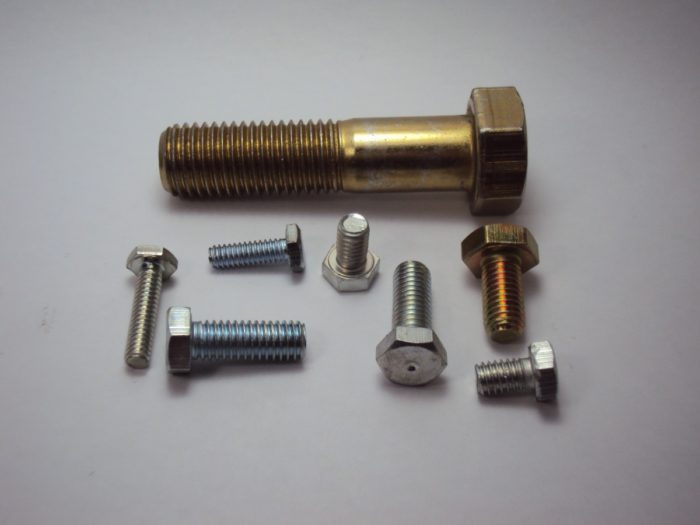
For the most part, structural bolts are made of steel and steel corrodes. Depending on the environment, other materials like brass and stainless steel corrode to.

Steel is the material of choice and if we want it to last, it needs some protection. This protection comes in the form of platings and coatings. The most common are zinc, galvanized and black phosphate.

Characteristics of a Good Plating

A bolt’s number one enemy is rust, since the overwhelming majority are made of steel.  Most steel fasteners have some sort of coating on it which will turn white or gray, but the type of corrosion that we are concerned with is called ‘red rust.’ This is when the steel starts to corrode.

The method for evaluating the time to red rust is by using a salt spray chamber.  In this chamber, a fine mist of salt is sprayed on parts continuously.  Once red rust appears, the test is complete and the hours are logged.

Generally, exposure to chemicals or other substances that cause rust within 50 hours is not a good coating for general outdoor applications. Once you are able to get around 100 hours without rust occurring, then you are getting some good use out of that bolt.

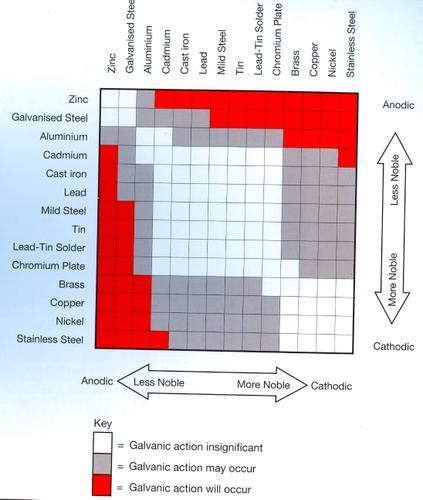
In the salt spray test, the white or gray is a lesser type of corrosion that doesn’t directly lead to failure.  It is simply materials other than steel corroding first.  This corrosion order is based on the galvanic chart.

And there are a lot of choices out there. Doing a search on McMaster Carr, there are 36 different platings for fasteners available. So, there is a lot to choose from.

Some of these platings are simply non-starters because they cost too much. Gold and silver platings fit here, but they are also undesirable for corrosive environments because they are too noble. Let me explain.

Galvanic Corrosion

Different metals are more noble or rust resistant than others. When dissimilar metals are mated together, they form a battery. As a result one will always corrode before the other. 

We’ve all see a corroded battery terminal. This is caused by dissimilar metals. This is also how thermocouples function. The wires of dissimilar metals will create a current and we can measure that current and get a temperature

https://upload.wikimedia.org/wikipedia/commons/a/ab/Thermocouple_wire_with_plug.jpg
Achim Hering, CC BY 3.0 https://creativecommons.org/licenses/by/3.0, via Wikimedia Commons

This is why underground propane tanks have a copper wire attached to a large chunk of zinc.  The zinc will corrode before the steel in the tank will.  Since our parent material is steel, to get the best rust prevention, we would want to use substances that don’t interact.  If we went to a more noble material like gold, not only would the fastener cost a fortune, but it would essentially rust from the inside out.  We definitely don’t want that to occur.

https://www.mgexp.com/phile/40/78322/galvanic_corrosion-Astley.jpg
image source – https://www.mgexp.com/phile/40/78322/galvanic_corrosion-Astley.jpg

The game here is to have a coating on the fastener that will corrode before the steel parent material, but also give plenty of time for it to corrode.  Oh, and we do not want to interfere with the thread fit or fastener friction and it must look pretty at the same time.  You can see that this is not an easy task!

Plating Processes

Electroplating

Electroplating is a method of transmitting the plating to the parent material using electricity. This process takes place when a beaker is filled with water and a piece of zinc material with the bolt is placed into the water. Beside the beaker of water is a battery with the positive terminal attached to the zinc and the negative terminal attached to the bolt. Eventually, the surface material of the zinc is deposited onto the bolt. Depending on how long you continue this process and the rating of voltage used will determine the thickness of the plating the bolt. Obviously, if you are making these by the millions, you aren’t using a battery and a beaker, but you get the idea.

Electroplating isn’t without its issues. For high strength bolts, generally higher than grade 8, electroplating introduces the issues of hydrogen embrittlement and stress corrosion cracking. Read this article for more information on those.

The electronic process introduces hydrogen or other electrolytes into the fastener that severely weaken the fastener. This risk is mitigated by “baking” the fasteners after the plating process to remove the hydrogen.

Hydrogen Embrittlement was a major issue back in the 1980’s and led to the Fastener Quality Act of 1990. This act put requirements for manufacturer identification, accreditation and testing.

Mechanical Plating

Many manufactures avoid the use of electroplating altogether for high strength fasteners by mechanically plating them. This is a process where fasteners and the plating material (usually zinc) are tumbled in a drum until the zinc is embedded on the fastener. For a visual cue, imagine throwing zinc and some screws into a cement mixer.

Vapor or Vacuum Plating

Another way to avoid the use of electroplating is to vacuum plate them. In this process, parts are loaded into a chamber and the pressure is reduced far below atmospheric pressure. The metal to be deposited is vaporized using a filament. The material will then flow onto the base material. This process can be repeated several times with different materials such as cadmium with a top coat of hexavalent chrome.

Common Platings

I did a search on McMaster Carr for different platings for screws and found that there were 36 different available finishs for a screw. That’s a lot. Let’s focus on the widely used ones.

Trivalent Chrome Zinc Plating (White Zinc)

When we think of zinc plating, for the most part we are thinking of trivalent chrome zinc plating. This is also known as white zinc plating where it has a layer of zinc and then a top coat of trivalent chrome. It is the go-to finish, but it doesn’t offer a great resistance to corrosion. You will find this in your local hardware store.

In an outdoor application you may get 12 months use out of the fastener before you see red rust. (Ask my lawnmower deck.)

Hexavalent Chrome Zinc Plating (Yellow Zinc)

The next step up is hexavalent chrome to increase the salt spray life.  The hexavalent chrome version, also known as “yellow zinc”, offers far better protection, but it has landed on the RoHS list. It is still readily available, but in the not too distant future, it will go the way of the Dodo.  You may remember that the movie Erin Brockovich was about the use/misuse of hexavalent chrome (it’s a good movie, I recommend it)!

These fasteners are readily available from manufacturing suppliers like Fastenal, MSC and McMaster Carr. Buy from these vendors rather than going to the hardware store.

Hot Dipped Galvanizing

Another method of rust protection is called galvanizing. This is essentially putting larger amounts of zinc at high temperatures on the fastener.  It can be expensive and hard to work with as you must use a different torque for it and it is a class 1 thread that requires class 1 nuts. Unless you are looking at severe exposure, it is preferable not to use this material.

Cadmium Plating

Cadmium plating is widely used in the military and aerospace industries. It is a great sacrificial coating for the steel, but it doesn’t have galvanic characteristics like zinc does. The combination of the two materials doesn’t form a battery that enhances corrosion.

Cadmium can also be used with chromate top coats (Trivalent or Hexavalent) and it can be applied through electroplating or vacuum plating.

The major downside to the use of Cadmium is it is a natural toxin like lead and mercury and is on the RoHS list. I do see that this plating will be around for a long time. The military and aerospace industries don’t like change and to mitigate risk, it will take a long time to implement. I can’t blame them; there are many lives at stake.

Black Oxide

Black oxide is probably one of the worst coatings out there. It corrodes very quickly outdoors. This is unfortunate because it actually give rise to one of the biggest issues of plaguing the fastener industry; the socket capscrew.

Socket head capscrews are all grade 9 (high strength) fasteners AND class 3A threads (tight tolerance) according to the governing standard. As a result, black oxide is the go-to plating because it is cheap and doesn’t add much thickness. As a result it doesn’t mess up the thread tolerance.

As more and more of these fasteners have moved from the inside industrial space to the outside world, better platings are needed. However, the thread class prevents using mechanical plating techniques and the high strength of the material prevents reliable electroplating due to hydrogen embrittlement.

Many suppliers will not warranty electroplated socket set screws. Some will not sell them and others demand a signed form releasing them from liability.

I have a feeling that by 2030, the governing standard will be relaxed to offer the fastener in a class 2A thread and / or a grade 8 strength as well as the current offering.

Where We are Going – Coatings

We also have coatings which are specifically designed to go on the bolt itself. These are made in the process called spin-dip which is similar to mechanical plating.

Since they are not electroplated, there is no risk of hydrogen embrittlement. You can get them in a variety of colors and there is opportunity to add lubricity to the threads. Coatings tend to have a very high salt spray life upwards of 1,000 hours. However, it is important to note that they are thicker and can disrupt your friction factor on the bolt.
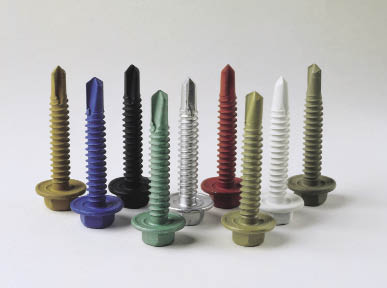
The Magni 565 coating allows formulating lubricants into the topcoat, usually eliminating the need for messy post-treatments. This non-electrolytically applied, zinc-and-aluminum-rich coating also eliminates concern of hydrogen embrittlement. The coating can be formulated in many colors. It also comes in several friction levels while providing good consistency across many bearing surfaces.

Some of the major players in this market are Geomet and Magni.

These coatings are the growing trend in fastener technology and is the direction all major users of fasteners are headed. Unfortunately, if your quantity is not high, you probably won’t be using these anytime soon. Right now, these coatings are a premium and are used for critical applications where failure is not an option.

Conclusion

In this article, we have explored the main finishes for fasteners and discussed the pros and cons of each material and process.

In my design work, I avoid the use of fasteners higher than grade 8 and prefer the use of the yellow zinc plating. My second choice is hot dipped galvanized followed by cadmium.

While I welcome the coming movement of coatings, I still see it being at least 15-20 years before it reaches the general population.

How to Select a Washer in a Fastening System

Selecting a washer for a fastening system is an important, but often overlooked step in designing a fastening system. Washers need to be selected based on the load in the joint, the materials in the joint and, as always, the environment.

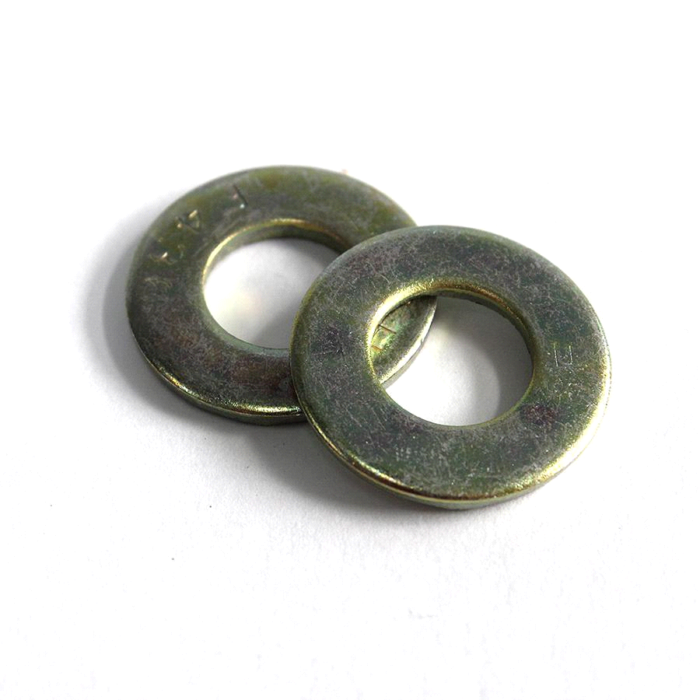
Yellow Zinc Plated SAE Washers

Can a Washer Be Installed Backwards?  

Interestingly, the answer is YES: many people do not realize that washers can be installed backwards. 

I often get strange looks when I explain this to young engineers. They think that I am playing a joke on them.

Since washers are formed from a stamping process, only one side will have a radius because they are only formed on the top leaving a sharp edge on the bottom.

If I look at a hex bolt it will have a slight radius between the head and the shank.  We want to have the radii of the washer and the bolt mate. Having the sharp corner of a washer poking into the bolt’s radius can cause a dent which impedes stress from flowing from the shank to the head. This creates a large and unnecessary stress concentration leading to premature failure.

To tell which way the washer is to be installed, run your finger over the hole on each side. The side that is smoother has the radius and should face the head of the screw / bolt. It doesn’t matter on the nut side, but I usually install it with the smooth side facing out.

Washer Types

In general, there are several different styles of washers.

  • USS (Large, Wide or Type A) – Good for general use. Have a large outside diameter making them good for use with softer materials like wood, plastic and fiberglass. This is a good general use washer.
  • SAE (Narrow) – When fastening stiffer materials, like steel, this is my go to fastener. They are strong and smaller then the USS washer (both OD and ID). When using near welds or bends, you can get a hole closer with this washer.
  • Fender – These are huge washers that cover up imperfections, often used in sheet metal applications. These are thin compared to a USS or SAE washer so if you need to transmit a larger load, use it with a USS washer.
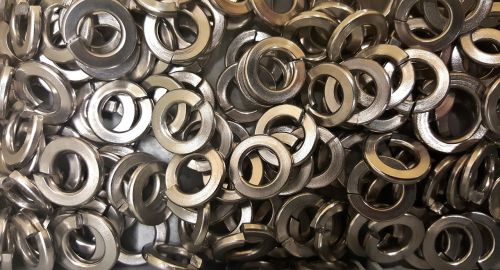
  • Split Lock Washer – These are washers that I have a slit cutout and are formed sprung open. When load is applied, they will flatten and keep the fastener in tension. These have a tendency to deform under high loads and are not recommended for structural joints.
Split Lock Washers
Image Courtesy of Needpix.com
  • Serrated (Star) washers – These washers are great for sheet metal applications such as household appliances and grills. However, it is intended to scratch surface paint to lock in place so there will be corrosion. Not the best choice if you are using it outside on steel.
  • Countersunk or Finishing Washer – These washers are taller than the other washers because they are countersunk to allow the head of a countersunk screw to be flush when installed.

In my mind, this kind of defeats the purpose of using a countersunk screw in the first place. Countersunk screws are used so that there is nothing sticking up past the parent materials surface.

If the material is too thin too accept a proper countersink, adding this washer isn’t the solution. I would switch to a button head capscrew instead. This will eliminate the need for a countersink while giving the minimal amount of a head height.

  • Spherical Washer – This two part washer allows for angular adjustment if holes aren’t perpendicular to the fastener. Rather than adding a bending stress to the screw, the spherical washer adjusts so bending stresses are eliminated. A tolerance of 3° to 5° can usually be accommodated.
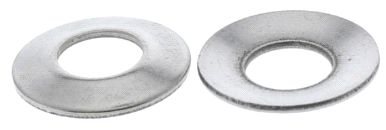
  • Bellville Washer – These magnificent creations are cone shaped washers are the split washer’s “big brother.”
Bellville Washer

A Bellville washer offers more resistance to screw loosening because when tightened, it flattens the cone.  These washers have other uses as well; I once designed a limited slip differential using a series of these. 

If you want more compression force, you can stack these as they would naturally stack.  If you want more travel, you can stack them so that the top of the cones touch.  You can arrange these in multiple ways so that you can get the system characteristics you want using standard off the shelf parts.

When Selecting a Washer Keep in Mind These Rules of Thumb

  • The softer the material, the larger the washer needs to be.
  • Have approximately the same stiffness for all components of the joint.

The Softer the Material, the Larger the Washer Needs to Be

It doesn’t take much insight to realize that a steel washer can easily be drawn into wood leaving an impression if over torqued. The same applies to plastics, rubber and fiberglass. Rubber and plastic is pretty forgiving, but an indentation in wood or fiberglass will cause the material to be weaker.

The solution to this is to increase the washer diameter. Wooden joints should have at least a USS washer. If possible, use a USS washer with a fender washer underneath to get the maximum amount of contact surface area.

Have Approximately the Same Stiffness for All Components of the Joint.

As your load increases, ALL the materials in your fastening system need to be equally as stiff. There have been major structural failures, like the Kemper Arena collapse in 1979, that were caused (in part) by fasteners bolting non-similar materials.

Bolting steel with rubber, plastic, and / or wood for a load bearing structure is not recommended. If non-similar materials are used, fastener load can fluctuate with applied load, weather, humidity etc. leading to loss of preload and increased fatigue load.

The Kemper Arena failed because 1 of 4 bolts in a pattern that was repeated throughout the structure lost preload. This caused the remaining bolts to take the load, but it also added a prying action that was unintended. This overloaded the remaining fasteners and eventually caused the ultimate failure.

Washers are available in both hardened and non-hardened materials.  It is important to match high strength bolts to high strength washers.  In practice, you may want to have a hardened washer if the washer has a large hole to cover or spans a slot. 

Environmental Concerns

When considering a washer, we have to be concerned with not only the corrosion protection of the washer, but also galvanic corrosion between the materials.

Galvanic Corrosion

Galvanic corrosion exists between dissimilar metals as small currents of electrical energy are naturally created. (This is what makes thermocouples work.)

If we have a fastening system of zinc washers and cadmium plated steel bolts and nuts fastening aluminum to steel, we are going to see that the contact between: zinc and steel; and cadmium and steel will be subject to degradation due to galvanic corrosion.

However, there will be almost no interaction between the aluminum and cadmium and only mild interaction between aluminum and zinc or steel.

There is a lot more to cover here which I will do in a future article. You can read more here for now.

Recommendations

My first recommendation is to make sure that the bolt, nut and washers are all the same type of material and have the same plating.

For a long time, zinc has been the go-to material, but it doesn’t offer a great resistance to corrosion.  The next bump up is zinc with added trivalent or chrome to increase the salt spray life.  You will find this “white zinc” plating on most fasteners in your hardware store. They rust quickly, avoid these where possible.

My next plating recommendation is the hexavalent chrome version, also known as “yellow zinc”, offers far better protection (like 3x), but it has landed on the RoHS list and will be impossible to get in the next few years.  You may remember that the movie Erin Brockovich was about the use/misuse of hexavalent chrome (it’s a good movie, I recommend it)!

Conclusions

Selecting the right washer for your application depends first on selecting the right type of washer for your materials and application.

You’ll want to keep all of your fastener materials and plating the same to maximize life span.

You will also want to maximize the contact surface area for softer materials by using USS and / or fender washers.

Finally, removing soft materials from structural joints so that preload on the fasteners can be maintained.

Easy Guide to Selecting the Spider and Jaws for Shaft Couplers

This post is a continuation of a how to determine the torque needed for our coupler. Click Here to view it.

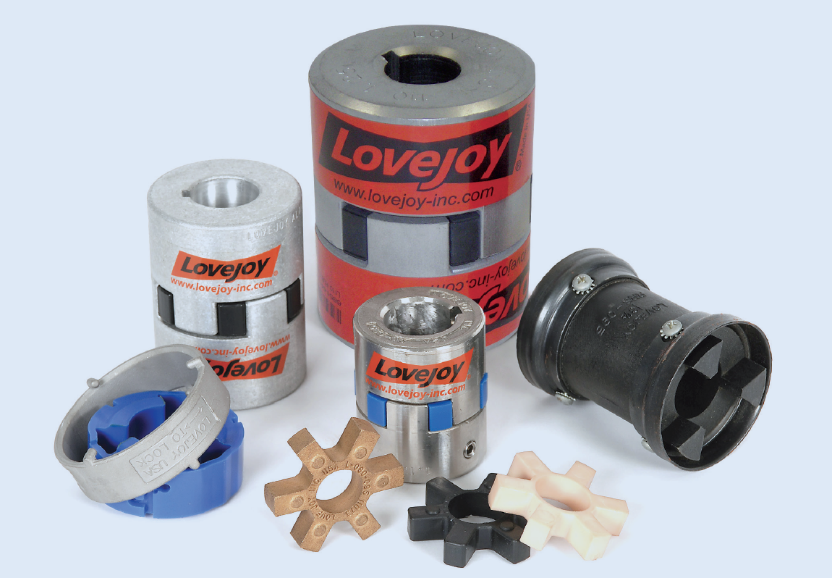
Jaw type shaft couplers are a lifesaver. These wonderful pieces of machinery allow for torque transmission between two different items and account for radial, angular and axial misalignment. It also has built in shock absorption that diffuses impact loads, like from reversing loads, and start up loads.

Jaw shaft couplers do this by having a mechanism, the spider, to connect two jaws. One Jaw connects to each shaft and the spider slips between the jaws. Great reasons to use jaw couplers include the following:

  • Allow for some misalignment (let’s face it, it is tough to get shafts to align right!)
  • Thousands of options for shaft size, torque transmitted and spider material
  • No metal to metal contact
  • Resistance to dirt and oils
  • Nearly maintenance free
  • Smaller sizes are readily available (no 8-12 week lead times). You can even buy them on Amazon.
  • Fail-safe. If the spider fails, the jaws will still make contact with each other. There will be metal on metal contact there, so be sure to replace the spider when this happens.

Spider Materials

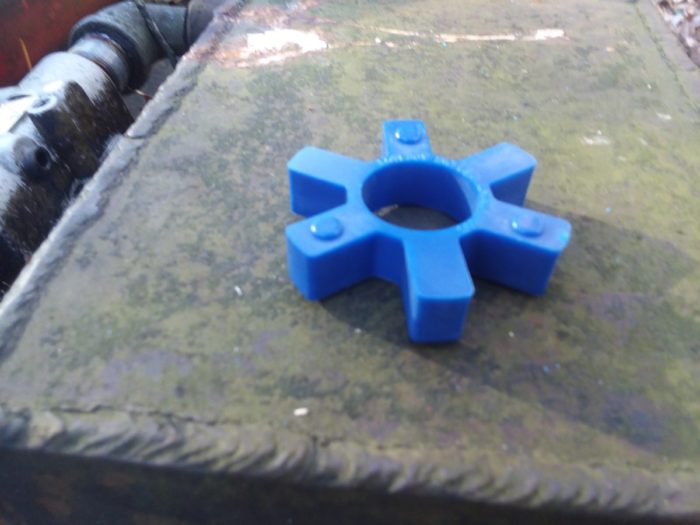
The spider gets it name from its shape…sort of. Obviously, the legs on it look like a spider except for one thing. Spiders have eight legs not six! Insect may be more appropriate, but spider sounds much cooler.

L90 Urethane Spider

Selecting the right spider material is imperative. It must be able to handle the torque applied and provide adequate shock absorption.

It is also important to consider operating temperature. Be sure to keep in mind if the local temperature of the coupler will be higher than the ambient temperature.

A general principle when selecting a spider material is that you are trading shock absorption for torque. A rubber material will definitely offer more shock absorption, than bronze, but bronze will handle much more torque. Let’s take a closer look at the most popular materials:

NBR Rubber

  • This common material is used in almost all hydraulic and plumbing seals.
  • Inexpensive
  • Readily available
  • Highly flexible
  • Oil resistant
  • Great shock absorption
  • Good temperature range of -40° to 212° F (-40° to 100° C)

Urethane

  • Has 50% more torque capacity than NBR
  • Good resistance to oil and chemicals
  • Good shock absorption
  • Operating temperature range of -30° to 160° F

Hytrel

  • Flexible
  • High torque
  • Greater operating temperature range of -60° to 250° F (-51° to 121° C)
  • More expensive

Bronze

  • Highest torque rating
  • Available in oil-impregnated metal
  • Very low speed (keep below 250 rpm)
  • Very little shock absorption
  • Not affected by water, oil, or dirt
  • Highest operating temperature range: -40° to 450° F (-40° to 232° C)

Selecting the Spider and Jaws

Continuing from the example in the previous post, we will use the 5 HP engine running at 2500 RPM and came up with 126 in-lb. of torque. Our service factor was determined to be 1.5 bringing our required torque to 190 in-lb.

Sizing the Spider

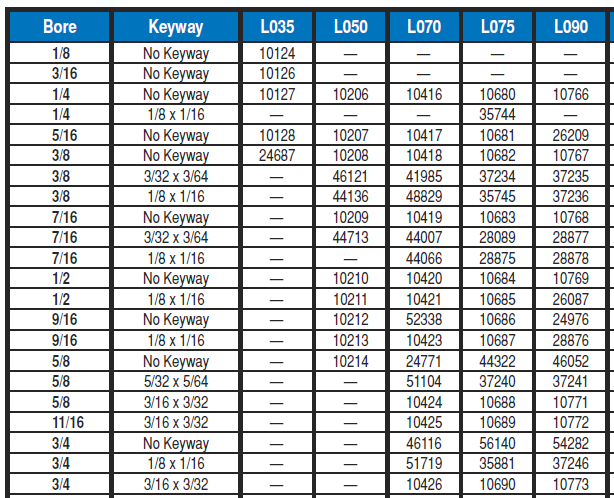
It is easier to select the spider first and then the jaw set. Looking at the table below, I can choose:

  • L095 for NBR
  • L090 for Urethane
  • L075 for Hytrel or Bronze. 

Because Hytrel and bronze are the most expensive and least flexible alternatives (not to mention that the speed is too high for bronze), I will not consider the L75 as viable options.

The choice is now down to NBR and Urethane.  If I choose NBR, I will pay more for the jaws, but less for the spider.  The main benefit that I see is the urethane has a higher torque rating (216 in-lb.) at the smaller size than the NBR has at the larger size (194 in-lb.).  This will lead to increased life of the spider.  In fact, it may never need to be replaced. 

With all of that said, I will select the L090 with the urethane spider.

We will go ahead and select the actual part numbers we need. Remember, we have determined that the coupling size will be the L90 series. Now it is time to find the spider type that fits our application.

I prefer to use a type with an open center so that the shafts can go into the space that the spider occupies if needed. Looking at the listing we will need to find the Urethane (open center) spider type and then the intersecting column under the L90 coupling size. Where these two meet we find our part number which in this case is 11075.

Real World Update

Since I inherited the log splitter used in this example, the existing coupler was an L90 size, but with a NBR coupler. This was enough to handle the torque without the service factor.

It wore out and you could hear the metal on metal clicking as a clear identifier of the problem. I have replaced it with a urethane L90 coupler. Time will tell if it ever needs to be replaced again.

Selecting the Jaws

Now we can find the jaw part number needed for our application. First off, we need to know what shaft size is appropriate.

Our pump has a 1/2″ bore shaft size, we will want to match this up in the part listing. Looking at the chart, we will find where the L090 series column and the 1/2 bore with keyway intersect to locate the part number 26087.

Notice that we have a keyway on this which is 1/8 wide and 1/16 tall. Normally the height will be one half of the width for the keyway so that a standard square key can fit.

We will do the same for the other shaft which has a 3/4 inch bore size and keyway will 3/16 wide by 3/32 tall. Referencing this size on our chart, we find the L090 column and the part number which will be 10773.

After determining and selecting which parts are needed, we will need to go ahead and place an order for:

  • L90 Urethane Spider 11075
  • L90 Jaw with 1/2″ keyed – 26087
  • L90 Jaw with 3/4″ 3/16 key – 10773

I will mention that a great benefit of Lovejoy couplers is the presence of product distributers on Amazon. This makes the ordering process easier and the shipping faster.

Final Thoughts

Finally, I would strongly recommend applying anti-seize to all parts before assembly in order to prevent rusting. This is a huge help if you ever need to take them apart (at some point you will) and it is nearly impossible to do without breaking parts if rust has occurred.

For example, I recently had to do this on a project and ended up having to cut a gear in half to remove it from the shaft. Make sure you take this simple step to help prevent the hassle of rusted parts. In the end it will help preserve the parts and aid in the process of disassembling if ever needed.

I hope this information has been helpful in the process of selecting the right parts for your own project.  The intent of this article is to familiarize you with jaw couplers, be able to calculate the torque and service factors and finally be able to select the jaw size and spider materials right for your application. 

Happy designing!

(All images/charts courtesy of Lovejoy Jaw Type Couplings Catalog)

How to Determine Torque Ratings of Shaft Couplers

Jaw type shaft couplers are a lifesaver. These wonderful pieces of machinery allow for torque transmission between two different items and account for radial, angular and axial misalignment. It also has built in shock absorption that diffuses impact loads, like from reversing loads, and start up loads. Jaw shaft couplers do this by having a mechanism, the spider, to connect two jaws. One Jaw connects to each shaft and the spider slips between the jaws.

Great reasons to use jaw couplers include the following:

  • Allow for some misalignment (let’s face it, it is tough to get shafts to align right!)
  • Thousands of options for shaft size, torque transmitted and spider material
  • No metal to metal contact
  • Resistance to dirt and oils
  • Nearly maintenance free
  • Smaller sizes are readily available (no 8-12 week lead times). You can even buy them on Amazon.
  • Fail-safe. If the spider fails, the jaws will still make contact with each other. There will be metal on metal contact there, so be sure to replace the spider when this happens.

Determining Torque

The first thing that we must do in selecting the proper jaw type is to calculate the torque and application service factor. Torque is relatively easy and straight forward to calculate. It can be done with the following formulas.

Pretty simple.

Service factor

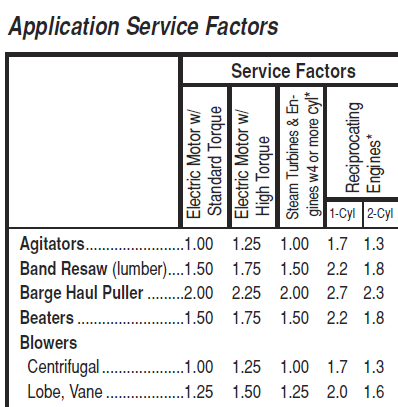
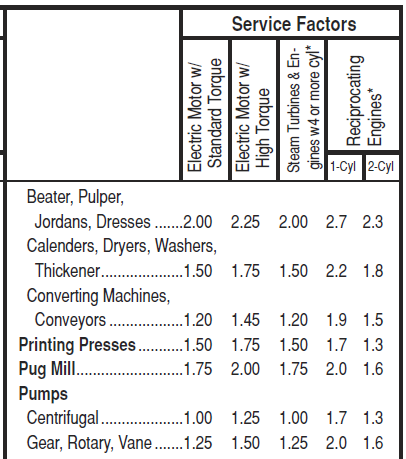
Now that we have this, we need to look up the service factor from the manufacturers chart.  Simply multiply the calculated torque by the service factor to get the torque needed to size the jaw.  The service factor is an essential element that accounts for impact loads that will be seen on the coupler.

Example of Typical Service Factors

For example, something powered by an electric motor will generally have a lower service factor than one powered by an internal combustion engine.  In single cylinder 4 stroke engines, every other rotation contains an impact load when the cylinder fires so there will be lots of torque for a brief moment.  Electric motors have much smoother operation. 

Every manufacturer has one of these charts. Look for two or three cases that describe your application. If they have different service factors, always pick the highest factor.

The reason for this because is while it a much better position to difficult to justify upfront costs if you can avoid future failures. Field failures are costly; there is lost production, diagnosing, engineering and fabrication costs, etc. that need to be considered.

Generally speaking, when a field failure occurs, there is way too much labor put in to solving the problem which adds up quickly and leads to a lot of costs. It gets worse if you are mass producing this item, because you may now have to add in the costs of field repair or worse, the cost of lost customers. So please, size it to the larger service factor.

Once you have the required torque value, you are ready to select your spider and jaws.

Learn how to Select the Right Spider and Jaw Set

Application Example

In my world, things without a practical application are worthless. So, I wanted to use the log splitter power train as an example.

The power source is a basic Harbor Freight 5 HP gas engine that will meet our needs.

Even a Harbor Freight engine should last for years if given proper maintenance and kept covered so that exposure to moisture does not get inside and cause it to rust. These few steps can help you extend the life of a motor and save you money in the long run.

Our pump is a Haldex two stage gear pump with a ½” keyed shaft. Right off the bat, we are going to need something to handle the difference in shaft size. A jaw type coupler will be perfect because we can use two different jaw parts.

Ok, let’s get started. I have had great success using Lovejoy L series couplers for applications such as these. We first need to size the jaw part of the coupler and we do this by calculating the torque. We will use the 5 HP engine running at 2500 RPM and come up with 126 in-lb. of torque required.

After finding the nominal torque, the next thing we want to do is make sure we are using the correct service factor. This is an added design factor based on the application.

Looking through the Jaw Application Service Factors guide we do not find a listing for hydraulics. Instead, we will need to find the section where we can locate the proper pump. For this application, we will be using a Rotary Gear Vane Pump and will want to use a higher service factor. In this case, I am going to go ahead and use the 1.50 service factor which will bring our torque to around 190-inch pounds.

Typical Services Factors for Jaw Couplers

Happy designing!

Learn how to Select the Right Spider and Jaw Set

(All images/charts courtesy of Lovejoy Jaw Type Couplings Catalog)

How to Count the Coils on a Compression Spring

Springs are essential to life. In fact everything on the planet acts like a spring, which follow Hooke’s law (F = k *x) . When force is applied to an object, it will deflect. If more force is applied, it will deflect more.

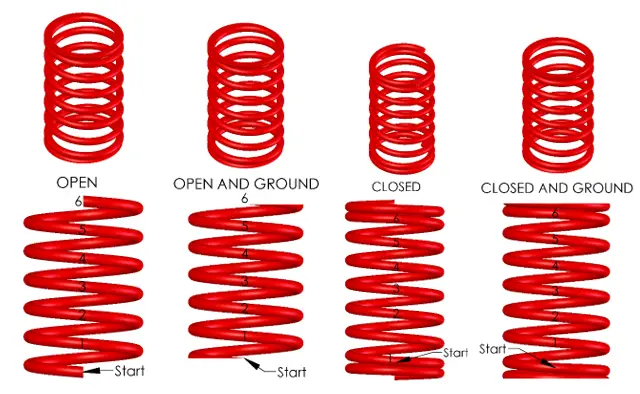
Count the total coils of the spring starting at one end and move toward the other end. This number does not have to be an integer. For an Open spring, this is the number of active coils. For a Open and Ground spring, subtract 1. For Closed or Closed and Ground, subtract 2 to get the active coils.

Counting the number of coils on a compression spring can be tricky.  There are two variables that specify the number of coils.  The value Na is the number of active coils and Nt is the total number of coils.  Only in the case of an open spring is Na equal to Nt.

Counting the coils in compression springs are tricky because not all of the coils count. First of all, you cannot count any coils where the coils are closed or touching.  These are inactive coils which don’t allow the spring to be a spring. 

The image below has common compression spring end types. The most common spring type is closed and ground which allow for stacking and even load distribution. The disadvantage is they take up more space.

Start counting each coil from one end to the other, starting where the section first opens.  (Indicated in image above) For an open end spring, this is the first coil.  Keep counting until you get to the other end of the spring.  Generally speaking, coils are counted as full turns, but half and quarter turns are also widely used.  Many spring manufacturers will allow two digits of precision on the number of coils.  For torsion springs, like clothes pins, you will specify the end condition in degrees.   

In the examples shown, each spring has 6 coils even though the closed end spring has 8 total coils.  The table below shows the relationship between active coils, total coils, the solid height and the pitch of each spring type. 

Note: It is customary to allow a 3% tolerance on the solid height of the spring to account for the end conditions, wire diameter tolerance and helical wind waviness.

How to Select the Right Type of Lock Nut

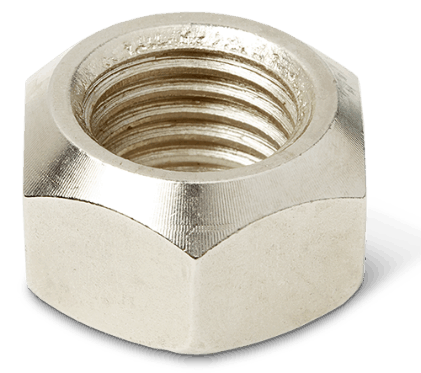
Nuts are the basic counterpart to bolts and screws. Most folks do not realize that nuts have grades just like screws. Typically, these grades will be stamped on the nut and need to match the corresponding bolt grade. For instance, if I take a grade 8 screw which will be between Rockwell C33-C39 the nut will be between C24-C36.

The highest selling screw is grade 8. Unfortunately, not many designers know that grades need to match because the highest selling nut is a grade 5.

The distribution of load on the nut is important as well. In general, the load is distributed on the first four threads of the nut.  This means that a structural nut needs to have at least four threads of engagement.  If the nut is the wrong grade, it will take more threads to distribute this load.  A standard nut does not account for this.  Match your Screw and Nut grades. 

When mismatched grades fail, it will look like the nut is trying to be rolled inside out until the screw can no longer engage the internal threads.

Types of Lock Nuts

Making sure a thread will stay engaged is essential to a good fastening system.  Locking nuts provide a great mechanism to do this, but there are other options we will discuss.

Serrated Flange Nut

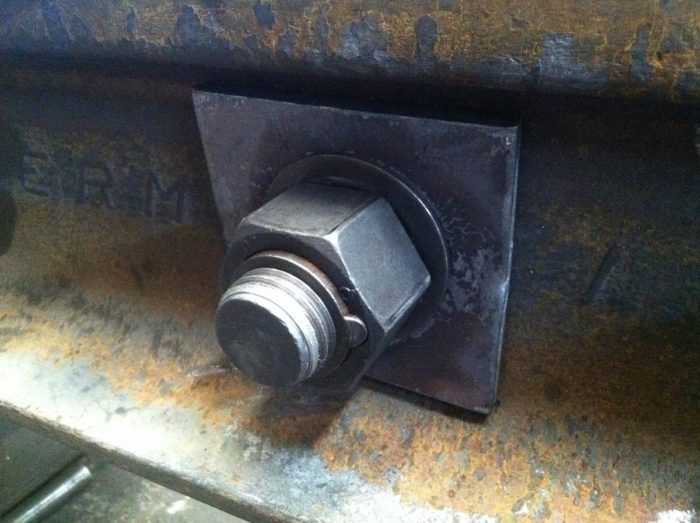
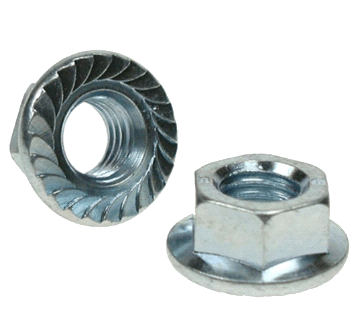
The first type is a serrated flange nut, which, when tightened has ridges that grab onto the parent material, providing a locking effect. However, these can cause issues with rust as the teeth lock onto the material scratch away paint or other coatings.

Unlike the others, it locks onto the mating surface and not the bolt. For this reason, it is not recommended in high vibration applications. Finally, never use these with a washer underneath.

Nylon Insert Lock Nut

The next type is a nylon insert lock nut or ‘nylock’ which looks like a regular nut, except for the crown on the top of it. The blue part shown is a piece of nylon and it is inserted into the crown.  When the bolt is inserted, it interferes with the nylon causing it to lock the nut in place.

In all honesty, I do not like these nuts because if you use an impact wrench or nut driver that tightens quickly, it will melt the nylon and make it impossible to remove the nut.  Well, you can cut it off…but you get my point. 

At this point, it is impossible to check the torque on the bolt because you are only testing how well the nut is attached to the bolt. If the nylon and screw do become fused together, your joint may become loose over time.  Unless you can see a washer move, there will be no way to ensure the fastener is under tension.

These fasteners are not reusable.

Oval / Distorted Thread Lock Nut

So my preferred locking nut is an ovulated (oval) lock nut.  This is a standard nut where the top of it is squished to provide the locking mechanism.  The most common is to have the squish (yup, technical term) on the top, but it can also be in the middle.  The oval nut overcomes the deficiencies mentioned earlier with the nylon lock nut.  It also doesn’t interfere with the torque required to get proper clamping load, but you will need wrenches instead of your fingers to get it snug.

Unfortunately, these nuts are not reusable either so throw them in the trash if you need to replace them.

It is also important to note that the nut must always be a softer material than the screw. If the nut is harder, it will destroy the threads on the bolt. This will strip the bolt before it locks onto the fastener. For this reason, you should match metal types when using this type of lock nut.

Jam Nuts

Jam nuts are just regular hex nuts but not as thick. They are used by applying a standard hex nut on the bolt and apply the desired torque. Then screw the jam nut behind it. Holding a wrench on both the standard and jam nut, torque the jam nut to 1/4 to 1/2 of the torque on the standard nut.

Jam nuts are one of my least favorite locking methods. In high vibration situations, the nuts can easily break apart and possibly fall off. They are good solutions for tie rods in steering axles so that the alignment can be changed without disassembling multiple parts.

Another reason, I stay away from them is they require a longer bolt length. I’m paying for more for the bolt and the extra jam nut.

Castle Nut

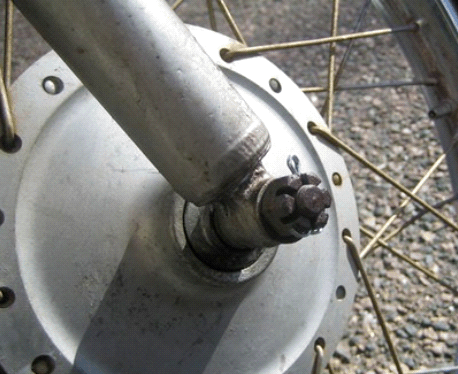
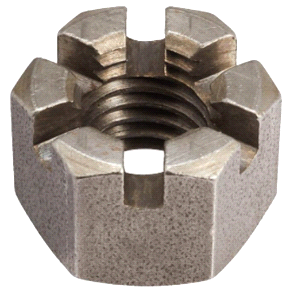
Another type of lock nut is the called the Castle Nut. These feature a taller nut with recesses, usually six of them.  The intent is to tighten the nut until it lines up with a cross drilled hole in the recesses.  A cotter pin is then inserted, preventing the nut from ever backing out.   This nut also has a few short-comings.  First, there is increased cost with cross drilling the hole in the fastener and it requires additional time assembling. 

The main reason I don’t like them, is there is a good chance that when this is at the proper torque, the hole and recesses will not align.  You will either need to over torque or under torque.  This problem can be eased by using fine threads instead of course threads. I would consider using a castle nut only if it was an application where the fastener could be loose but cannot come out.

Locking Mechanisms That Don’t Use Nuts

Micro-encapsulation

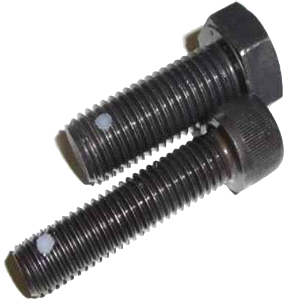
There are several locking systems which can be used alone or in conjunction with other mechanisms. A common one is called thread locking or micro-encapsulation.  A locking compound, usually nylon is placed onto the screw itself. This type mechanically locks the fastener by pressing it against the side of the tapped hole. With these, you can torque them about three times before the patch is worn out and the fastener needs to be replaced. 

Thread Adhesives

Another type of thread locking method uses an adhesive.  A chemical adhesive is applied to the threads of a fastener just before it is installed and torqued.  These fasteners need to be installed in a certain amount of time before reapplication is need. There are many different adhesives used and then are available in both permanent and semi-permanent formulations with the latter allowing you to re-torque the bolt.

Save 20% Off Most Items! Use Code: 20%OFF
Shop Now